Carrot & Date Balls

carrot-balls-westside-wellness

This beautiful recipe was given to me by dear friend. Without a doubt it was love at first bite - I am HOOKED on these suckers.... and guess what?! So are the kiddos!

These balls are sweet from the delicious medjool dates but the sweetness is nicely balanced by the addition of cinnamon which helps to regulate blood sugar levels. Because they are full of carrots they are packed fibre, anti-inflammatory healthy fats and beta-carotene. And I just LOVE the earthy taste of the nutmeg which gives them a delicious autumnal flavour.

At Westside we are constantly talking to clients about having healthy snacks like these on hand, so when you are feeling like a little "sumthim sumthin"  at the end of the day then you have some nutritious options to turn to. Simple!

Plus they take about 10 minutes to make so there really is no excuse.

Ingredients

  • 1 & 1/2 x cups of grated carrot
  • 6-8 x medjool dates
  • 1 x cup of raw nuts (I like pecan but walnut, cashew & almond all work well too).
  • 1 x small handful of shredded coconut
  • 1 x pinch of ground nutmeg
  • 1 x tsp of ground cinnamon
  • Zest from 1 orange
  • 1 x tbs of almond meal or LSA to bind 
  • Extra shredded coconut to roll the balls in at the end

Method

  1. Blend all ingredients except for the almond meal/LSA together in a food processor until well combined. 
  2. Stir in the LSA or almond meal
  3. Roll mixture into balls and then roll each ball in some shredded coconut.
  4. Refrigerate in a sealed container for up to 2 weeks. 

Enjoy xx 

carrot-balls-healthy-snack-westside-wellness

Slow Cooker Chickpea and Pumpkin Curry

butternut pumpkin.jpg

We love slow cooker curry in our house and easily eat one every week. I love being able to chuck something on first thing in the morning and know that all I need to do for dinner that night is cook some rice (I often do that in advance and freeze it too, saving even more time!).

This slow cooker chickpea and pumpkin curry is slightly sweet, creamy and very mild and a huge hit with my kids, especially my 2.5 year old who will ask for curry for days after we've had this one. Chickpeas are a fantastic source of fibre and magnesium, two nutrients most of us need extra of! The spices are great for settling tummies and reducing inflammation and the veggies are generally the cheapest you can get, making this a very cheap (and nutritious!) family meal.

It freezes well (minus the potatoes) and tastes even better when kept in the fridge for a few days before eating. I hope you enjoy my favourite slow cooker curry! x

chickpeas ginger IG.jpg

Serves 4-6

Prep time: 10 minutes

Cook time: 30 mins in a hurry; 6 hours slow cooked

INGREDIENTS

  • 1 onion, chopped

  • 4-6 cloves of garlic, finely chopped

  • 1 inch piece of ginger, peeled and finely chopped

  • 1 inch piece of fresh turmeric, peeled and finely chopped (OPTIONAL but delicious)

  • 1 medium potato, washed and cubed

  • roughly two cups butternut pumpkin, cubed

  • 1 medium zucchini, cubed

  • 1 tin diced tomato (salt reduced)

  • 1 tin coconut cream

  • 1 tin chickpeas, drained and rinsed well (or 300 g pre-soaked and cooked chickpeas)

  • 1 tbs sesame oil

  • 1/2 tsp salt

  • few cracks of pepper to taste

  • 1 ½-2 tbs curry powder

  • 1 tsp stock paste

  • couple handfuls of chopped greens like kale or silverbeet

curry spices.jpg

METHOD

  1. Heat the sesame oil in a pan, add the onion, garlic, ginger and turmeric. Sauté on a medium heat until the onion is translucent (approx. 5 minutes). This step intensifies the flavour, but can be totally skipped if your in a hurry.

  2. Set up your slow cooker*. Chuck in the cooked onion mix, and the rest of the ingredients, and combine well.

  3. Cook for 6 hours on low heat (stir occasionally to prevent the sides drying out). Chuck in the chopped greens in the last 10 minutes or so and mix through. Serve with cooked brown rice, quinoa or cauliflower rice. A dollop of natural yogurt goes very well with this too!

*If you don’t have a slow cooker, this can easily be slowed cooked in the oven at 180 degrees for 1 ½-2 hours, just chuck it in a casserole dish or dutch oven (you will need to stir occasionally). It can also make a pretty quick meal by cooking on the stove top in a large pot. Follow step one, then add the veggies and sauté for a few minutes. Add the remaining ingredients, bring to the boil, reduce heat and simmer for 30 minutes. It’ll be tasty but the flavours won’t be as rich.

slowcooker chickpea curry.jpg

Homemade Mild Curry Powder

curry spices.jpg

Homemade curry powder is such a cheap and simple thing to make, I don't know why people don't make their own more! Store bought curry powder often has colours, additives and preservatives, so making your own enables you to know exactly what you are putting in your cooking.

I don't generally insist that people choose organic produce when cooking, but when it comes to herbs and spices there really is a huge difference! Spices will last up to 12 months when stored in an airtight container, so despite being a bit more expensive, you will still get bang for your buck. And did you read the Choice review that talked about the actual percentage of oregano that was in common/popular brands of herbs? Make sure you buy reputable brands such as Gourmet Organic Herbs or by bulk herbs online from Honest to Goodness or shops like Terra Madre (if you live in Melbourne).

This curry powder will make enough for 5-8 curries (depending on how strong you like your curry) and will last approximately 12 months in an airtight container.

In a bowl, combine:

  • 4 tsp cumin ground cumin

  • 4 tsp ground coriander

  • 3 tsp turmeric powder

  • 2 tsp mustard powder

  • 1 tsp cardamom powder

  • ½ tsp ground cinnamon


Place in an airtight container and store away from heat and direct sunlight.

Grain Free Apple Cake

Apple-cake.jpg

I came across this recipe on Fresh Planet Flavor looking for grain-free sweets to recommend to a client and have come to find it a very reliable, healthy & kid-friendly recipe. I've made a few minor adjustments and added a few steps about how to make your own applesauce because it's very easy to do.

Why Grain-Free?

You can probably tell that a lot of the recipes on our website are grain-free, this is because we find many of our clients struggle to digest them well. Also you can quickly boost the nutrient content of a meal once you swap something like processed white flour for buckwheat flour or coconut flour.

Make Your Own Applesauce

Applesauce works as a wonderful binder in recipes to bring ingredients together. It also add some sweetness and extra fibre to a recipe. You can purchase some from a grocery store but it is very easy to make and will save you a few extra dollars for something else. All you need is 4 ingredients and the cake recipe will leave you with plenty left over for pancakes or baked goods!

 Ingredients for Applesauce

  • 4 apples peeled, cored and roughly chopped
  • 1/4 cup coconut sugar
  • 1 tsp ground cinnamon
  • 3/4 cup of water

Method for Applesauce

  1. Place all ingredients into a large stainless steel pot.
  2. Cover and bring to the boil.
  3. Simmer for 20 minutes until the apples are soft (taking care that the water doesn't completely evaporate while cooking).
  4. Once cooled mash apples with a fork or hand blender

Applesauce will store in a glass jar in the fridge for up to 2 weeks. You can also freeze in an airtight container for up to 2 months.

Ingredients for Cake

  • 1/3 cup of coconut flour
  • 1 tsp gluten free baking soda
  • 1 tsp ground cinnamon
  • Pinch of sea salt
  • 2 eggs
  • 1 tablespoon of maple syrup or rice malt syrup
  • 1 tsp vanilla essence
  • 1/2 cup of applesauce
  • 1 apple, thinly sliced horizontally
  • Coconut oil to grease

Method for Cake

  1. Preheat oven to 170°C
  2. Grease a small cake tin with coconut oil. I used a 10cm x 21cm loaf tin.
  3. Sift the coconut flour, baking soda, cinnamon & salt into a small bowl.
  4. Whisk the eggs, sweetener, vanilla essence & applesauce until well combined in a large bowl. 
  5. Gently add the dry ingredients into the wet ingredients while continuing to whisk the mixture. The mixture will become very stiff. 
  6. Add the mixture to the pan and smooth the top of the cake. Add the thinly sliced apples to the top.
  7. Bake for 40 minutes until the mixture feels firm to touch and is golden on top.
  8. Allow to cool before removing from the pan.

Serves 6.   

Homemade SLAP (LSA)

LSA.jpg

Add some extra nutrition to your muesli, smoothie or salad with the help of SLAP. It takes less than 5 minutes to make, stores very well in the fridge, and is less expensive to make than buying packaged LSA.

What is SLAP?

SLAP is an acronym for Sunflower Seeds,  Linseed, Almonds & Pumpkin Seed. It's much like LSA but contains added zinc from the pumpkin seeds (bonus!). SLAP/LSA is powerhouse of minerals, healthy fats and fibre. This means this simple nut & seed blend can improve your bowel function, brain function, muscle repair and bone health.

Why Does LSA Need to Be Refrigerated?

LSA or SLAP contains omega 3 fatty acids with can easily oxidise if kept at a warm temperature. A cool and stable fridge temperature can help to keep the fats stable and keep all their anti-inflammatory health qualities.

How Should I Use SLAP/LSA?

There are lots of ways you can use this nutrient-rich blend. Here are some ideas for how to incorporate it regularly into your diet:

  • Sprinkle over muesli
  • Add a tablespoon to your smoothie
  • Scatter over a salad
  • Add a tablespoon to pancake/pikelet mixture
  • Throw some on you porridge
  • Add a tablespoon to baked goods to boost nutrition

Ingredients

  • 2 tablespoons of sunflower seeds
  • 2 tablespoons of almonds
  • 2 tablespoons of linseeds (flaxseed)
  • 2 tablespoons of pumpkin seeds (pepitas)

* We recommend you source organic raw ingredients where possible to increase the healthy fat content of these seeds/nuts.

Equipment

  • You will also need a high powered food processor or coffee grinder.
  • Glass jar for storage

Method

  1. Throw all ingredients into your food processor.
  2. Process on high speed for approx 3-5 minutes until all the seeds and nuts are broken down into a course flour-like consistency and not large chunks remain.
  3.  Store in a glass jar in the fridge for 3 months.


Mini Choc Chip Cookies

chopped chocolate web.jpg

OMG, who doesn’t love tiny little choc chip cookies??? These babies have this lovely kinda wholemeal texture, but the chocolate makes them feel decadent and indulgent. Amazingly they stay really soft if kept in a airtight container, so I take a little box to work at the beginning of the week, for little arvo pick me ups, and they work a real treat! And bonus, my kids absolutely love them which is great as it can be difficult to find treats that are gluten, dairy and soy free for my two year old.

I generally bake them using coconut sugar, but have recently started using rice malt syrup instead in order to cut the sugar content down even further and love them! With rice malt syrup, they're more of a chewy, flat cookie and a little softer so be gently with them. If you're a real sweet tooth, stick with the coconut sugar, otherwise rice malt syrup is the way to go!

-Renee x

Makes 15 or so

sunflower seeds web.jpg

INGREDIENTS

  • ¼ cup sunflower seeds

  • 1 cup (or just under) Loving Earth mylk chocolate, chopped (use 90% Lindt chocolate instead to reduce fructose content further)

  • ½ cup unrefined coconut oil

  • ½ cup coconut sugar*

  • 1 tsp vanilla extract

  • 1 1/3 cup brown rice flour (you can also use almond flour)

  • 1/3 cup of each besan (chickpea) flour and tapioca/arrowroot flour

  • 1 tsp baking powder

  • 1 tsp baking soda

  • 1/8 tsp salt

  • 1 tsp cinnamon

  • 2 flax egg (2 tbs ground flaxseed + 4 tbs water mixed together)

  • 1/3 cup of plant based milk (soy, nut, rice, coconut)

  • 1 tbs vinegar

*swap for ½ cup rice malt syrup; adjust milk to 0

  1. Preheat the oven to 180 degrees. Line a couple of baking trays with baking paper, grease with a little coconut oil (you 100% need to do this if using rice malt syrup) and set aside. Add the vinegar to the ‘milk’ and roughly chop the chocolate and set both aside.

  2. In a large bowl cream together the coconut oil, coconut sugar and vanilla extract.

  3. Add the rest of the dry ingredients and combine well, then add the milk/vinegar combo and mix well. Stir in the chopped chocolate and sunflower seeds.

  4. Form the dough into walnut sized balls, place on the baking trays and gently flatten with a fork (if you're using rice malt syrup the mix will be quite wet, spoon 1 tbs of batter per cookie, keeping them spaced apart even further). Keep them fairly spaced out because they will expand a little.

  5. Bake for 10-12 minutes, or until they are golden brown. Keep an eye on them because they can overcook and will lose their chewiness.

**Please note these can dry out pretty quickly, so once they are cool (if there’s any left!) it’s best to keep them in an airtight container. If it’s really hot, best to keep them in the fridge and they’ll last close to a week.

cookie batter.jpg
raw cookies.jpg
cooked cookies Web.jpg

Cuban Black Beans

Cuban-beans-web.jpg

This recipe has been perfected by my beautiful best friend and husband, Aaron. He's adapted it over the years and tweaked it here and there. The thing I love most about this meal is that it lasts for 5 days in the fridge, and can help to add extra flavour and substance to other meals (even bolognese sauce!).  

It's best served with Spanish rice (recipe to follow) or with a fried egg and guacamole with salsa. 

Black beans are full of prebiotic fibre which helps to feed the beneficial bacteria of your large intestine. They are also a wonderful source of amino acids - particularly important when you are vegan or vegetarian and need to meet your daily protein intake.  

Ingredients

  • 2 cups dried black beans + reserve water from cooking
  • 1 tsp cumin seeds
  • 1 bay leaf
  • 1 tbs apple cider vinegar
  • Generous slug of extra virgin olive oil
  • 1 carrot, chopped into small discs
  • 1 red onion, sliced lengthways
  • 3 cloves of garlic, finely diced
  • 1 fresh jalapeño, finely diced
  • 1/2 green capsicum, diced 
  • 1 ear of corn, kernels removed
  • 2 tomatoes, medium sized, chopped
  • 1 tbs tomato paste
  • 1 tbs mixed herbs
  • 1 tbs cumin powder
  • 1/2 bunch of fresh coriander, chopped
  • Pinch of salt
  • Optional: 1 of the following dried chilis: pasilla, guajillo, chipotle

Method

  1. Soak beans and cumin seeds in plenty of water overnight (approx. 8-10 hours)
  2. Strain and discard water.
  3. Place beans, salt, bay leaf and dried chilli (optional) in a large stainless steel pot and cover with water.
  4. Bring beans to the boil and then simmer for 30-40 minutes until beans are almost cooked through.
  5. Strain beans BUT reserve cooking water.
  6. Using the same pot return to the stove (medium heat) and add oil. After heating oil add onions and cook until translucent. Then add jalapeño and garlic, and cook for 5 minutes. 
  7. Then add tomato paste, cumin powder and mixed herbs, coat the onion mixture. Keep stirring until the mixture begins to dry (approx. 3 minutes). 
  8. Add strained beans, carrot, apple cider vinegar and lime juice to the pot. Then add enough of the reserved cooking water to reach the level of the bean mixture in the pot (about 1.5 cups depending on the size of your pot).  
  9. Cook bean mixture for 10 minutes.
  10. At this point check that the beans or properly cooked through. If not continue to cook until the beans are nicely soft (you may need to add more reserve cooking water if the mixture is drying). 
  11. Add coriander, chopped tomatoes, caspcium and corn. Cook for a further 10 minutes.
  12. Serve warm with Mexican rice and soft shell tacos.    

Serves 8.


Almond Butter

We LOVE nut butters here at Westside - they are a wonderful way to get nutrition and help to feel satiated (full) at the end of a meal. They are full of mono- and poly-saturated fatty acids meaning which means that they are great for brain function and can help to repent heart attacks. 

They are also wonderful sources of magnesium and calcium which also helps to regulate blood pressure and support mood. Think healthy HEARTS and BRAINS folks!

Nut butters can be costly, especially organic ones. At Westside we like to make our own, it's simple to do and also better on the budget.

Spread on toast, add to smoothies, slap onto a slice of apple and BOOM tasty snacks are ready to eat and full of nutritious goodness.

almond-butter.jpg

Ingredients

  • 3 cups of raw almonds, preferable organic

  • 3 pinches of sea salt

Method

  1. Preheat your oven to 160ºC

  2. Place all the almonds on the baking tray and heat in the oven for 10 minutes.

  3. Place warm almonds and sea salt into a high powdered food processor/thermomix.

  4. Process for about 10 minutes, stopping occasionally to scrap down the sides. The mixture will be chunky at first, then become powdery and then after a long time become rich a buttery.

  5. Store the nut butter in a glass jar.

Makes 1 cup. Keeps for 1 month.

Homemade Hazelnut Chocolate

I love chocolate so much! Its such a nice treat to have here and there, and although I thoroughly enjoy my quick chocolate recipe, I wanted something that was a bit more true to store bought chocolate without the dairy, refined sugar and fillers.

I always have cacao butter on hand in the cupboard, it stores well and its a nice thing to have on hand for desserts. I had been playing around with a 'nutella' recipe using hazelnuts and thought why not combine the two to make chocolate? The result? A delicious, dairy and refined sugar free chocolate that ticks ALL the boxes. It's enjoyed by all members of my family (especially my youngest who has to avoid dairy to manage his eczema), and I made a big batch to give away in little jars as gifts over the festive season and they were a HUGE hit!

I hope you enjoy this chocolate recipe as much as I do. xRenee

roasting hazelnuts.jpg

Cooking time: 25 mins

Total time: 1 hour 25 mins

Makes: 3-4 trays of chocolates in moulds

Ingredients

  • 1 cup hazelnuts*

  • 200 g cacao butter, roughly chopped

  • 1/8-1/4 tsp salt

  • 1 1/2 tsp vanilla essence

  • 100 g rice malt syrup**

  • 1/4 cup cacao powder

Method

  1. Preheat your oven to 150 degrees Celcius.

  2. Line a baking tray with baking paper (or silicon baking sheet) and spread hazelnuts on top. Bake for 10-15 mins, rolling the hazelnuts around at the halfway point for even roasting. Remove from oven once the skins have become darker brown and started to split.

  3. Allow the hazelnuts to cool, then place in an airtight container and shake vigorously until the majority of the skins have come off. Once the skins have been removed place in a food processor/blender/thermomix and process until smooth, scraping down the sides to ensure its processed evenly. Set aside.

  4. Set up a double boiler (a pot half filled with water with a glass or metal bowl on top) and bring the water to the boil. Add the cacao butter and melt, stirring occasionally with a whisk.

  5. Once the cacao butter has melted add the remaining ingredients (including the hazelnut butter) and whisk over the heat until well combined.

  6. Pour the mixture into chocolate moulds (I place the moulds on a baking tray so they don't spill as I transfer) and place them in the freezer for 1 hour. As you are pouring the chocolate mix, stir regularly as the hazelnut butter tends to sink to the bottom. These chocolate don't melt as quickly as other homemade ones, but are still best kept in the freezer.


*You can use 1/2 cup of store bought hazelnut butter instead

**You can use any other liquid sweetener (honey, maple, coconut nectar etc) or very finely ground coconut sugar. Using rice malt syrup allows this recipe to be fructose friendly.

small chocolates website.jpg

Veggie & Egg Breakfast Muffins

We so know what its like to be rushing around in the morning, trying to get yourself ready, maybe even your kids, trying to find clean clothes and drink bottles and all that jazz.  Getting a good breakfast in can be nearly impossible during these mornings! Some of us can handle that, but Renee absolutely cannot go without breakfast so she whipped up this veggie loaded, egg muffin recipe that you can make in advance and eat a couple on the go!

They make great, nutrient dense snacks too and freeze well, so you can double the recipe and freeze some for busy, busy times. Enjoy!

Makes 10 muffins

not cooked egg muffins.jpg

INGREDIENTS

  • 6 eggs
  • ½ medium zucchini, grated with excess moisture squeezed out
  • ½ small sweet potato, grated with excess moisture squeezed out
  • Large handful of leafy greens, roughly chopped
  • ¼ cup of milk (soy, rice, almond, dairy etc)
  • Salt and pepper

Optional additions:

  • 100 g beef mince, cooked in a pan with a little olive oil
  • 50 g feta, crumbled
  • 1 tbs savoury yeast flakes
  • handful fresh, chopped herbs such as chives, parsley, basil

METHOD

  1. Preheat oven to 180 degrees Celsius. Grease 2 muffins trays with a little olive oil and set aside.
  2. In a large bowl, whisk together the eggs, milk, salt and pepper. Add the zucchini, sweet potato and leafy greens and combine well. Add any of the additional ingredients and mix well.
  3. Pour mixture into muffin trays, half filling each segment.
  4. Bake for 20-30 minutes, until brown on top. These will keep in the fridge for 5 days, and freeze well.
egg muffins website version.jpg

Wild Rice Salad

wild-rice-salad.jpg

My mother and I created this salad together for our family Christmas lunch one year - and each year since we have rolled it out for our friends and family. The combination of allspice and orange combines perfectly with the fresh herbs, caramelised onions and currants. 

The thing I love most about it is that it can be mostly made the day before an event then easily assembled in the morning. Leaving the rice, nutmeg and herbs together overnight allows the flavours to wonderfully infuse. 

The salad pairs perfectly with turkey, chicken or salmon. 

- with love, Lucy x

wild-rice-herbs.jpg

Ingredients

  • 1 cup each of wild and brown rice
  • 4 x brown onions sliced
  • 1 cup of toasted flaked almonds.
  • 200g currants
  • ½ cup red wine vinegar
  • ½ bunch of flat parsley
  • ½ bunch of mint
  • 1 x tablespoon of fresh oregano
  • 1 x tablespoon of thyme leaves
  • ¼ teaspoon of ground allspice
  • Extra virgin olive oil
  • Sea salt
  • Pepper

Dressing

  • Juice of 1 orange
  • Juice of 1 lemon
  • ½ cup of olive oil
  • 1 x dessertspoon of raw honey

Method

  1. Add the rice blend to a large pot of boiling water. Cook uncovered for 20-25 mins or until tender. Drain and cool.
  2. To caramelise the onions: heat 30mls of olive oil into a large frying pan over low heat. Add onion, season with salt and pepper and cook for 20-30 mins. Stirring occasionally until caramelised.
  3. In a small pot boil currants in red wine vinegar for 5 minutes. 
  4. Combine caramelised onions and currants and allow to cool. 
  5. Combine rice, almonds, parsley, mint, oregano and thyme and ground allspice in a bowl and mix together. Cover and place in fridge to allow for the flavours to develop in the fridge (you can do this the night before serving).
  6. For the dressing simply combine all ingredients in a glass jar and stir well. 
  7. When ready to serve take rice out of fridge add half of the caramelised onion currant mixture, stir through. Top the salad with the rest of the mixture and sprinkle with almond flakes. 

Healthy Ginger Bread Cookies

If you like to get your bake on for the festive season, but want to cut down any nasties and/or sugar, than this recipe is for you!

These gingerbread cookies taste like the real deal but contain significantly less sugar AND are gluten, dairy and egg free, so perfect for any loved ones who may have intolerances.

You can make the dough well in advance, or double the batch to make a ton of cookies. Get creative and coat the cookies with our quick chocolate, or add nuts, seeds or dried fruit to jazz them up. Enjoy! xRenee


ginger bread ingredients web vers.jpg

Makes about 20-30 small cookies, less if your cookie cutter is bigger

rolled out ginger bread dough web vers.jpg

DRY INGREDIENTS

  • ½ cup besan (chickpea flour)

  • ½ cup +  2 tbs arrowroot flour 

  • 1 cup + 2 tbs brown rice flour

  • ½ tsp baking soda
  • ¼ tsp salt
  • 1 1/2- 2 tsp ginger powder
  • 1 tsp ground cinnamon
  • 1/4 tsp ground cardamon
  • ¼ tsp nutmeg
  • pinch of ground cloves
  • ½- ¾  cup of fine coconut sugar (depending on how sweet you’d like them)

WET INGREDIENTS

  •  ¼ cup of soy, almond (or any nut milk) or rice milk
  • 1 tbs vinegar (white or apple cider is best)
  • ¼ cup molasses
  • 1/3 cup unrefined coconut oil
  • 1 flax egg (1 tbs ground flaxseed + 2 tbs water, mixed together and set aside)
  • 1 tsp vanilla extract
uncooked gingerbread web vers.jpg

METHOD

  1. Add the vinegar to the milk and set aside.
  2. In a bowl combine all the dry ingredients, except the coconut sugar, and set aside.
  3. In a large bowl, cream the coconut oil, molasses, flax egg, vanilla and coconut sugar with an electric beater until well combined, then add the milk and vinegar mix and beat for a few seconds until combined.
  4. If you have an electric cake mixer, this next part will be easier. You need to slowly add the dry ingredients to the wet ingredients. I have done this without a mixer, you can add a few tablespoons at a time and mix it in by hand (the mix is quite wt, don't freak out it works!). Once everything is combined scoop into a container, cover with a lid and place in the fridge for 4-6 hours.
  5. When you are ready to bake, take the dough out about 45 minutes before you’d like to cook.
  6. Preheat the oven to 180 degrees. Line several baking trays with baking paper and set aside.
  7. Roll out your dough, between two sheets of baking paper, until it is about ½ cm thick. Using your chosen cookie cutter, cut out your cookies and place on your baking trays*. They will expand a little so place them with a bit of space between each one. Bake for around 10 minutes, but keep an eye on them. You want them to brown, but still be soft. Allow to cool, and then dust with icing sugar if you like or serve as is.

* If you don’t have enough space on your trays for all your dough, place the dough back in the fridge for 15 minutes or so until you’re ready to cut them out again.

cooked gingerbread web vers.jpg

Scrambled Eggs With Greens

Scrambled-eggs-dill-avo.jpg

We love eating scrambled eggs for breakfast! Eggs are full of excellent nutrients including vitamins A, B1, B2, B3, E, folate, biotin and vitamin D. They are also a powerhouse of protein containing 11g for every 100g of egg. 

If you are vegetarian, dairy-free, soy-free, gluten-free or following a paleo diet then scrambled eggs are an excellent option for breakfast or a healthy lunch.

When it comes to greens Renee and I just grab whatever is in the garden, spinach, chard, dill, parsley, coriander etc. But you can also raid your fridge and use grated zucchini, leftover steamed broccoli or asparagus - really whatever is on hand.

Sourcing Your Eggs

As with all animal products remember we always recommend sourcing eggs from organic or biodynamic pasture-fed chickens. This way you know you are reducing your pesticide exposure and are less likely to react if you have an allergen to either soy, corn, or wheat as these proteins may be found in eggs from grain-fed raised chickens.

Scrambled-eggs-cooking.jpg

Ingredients

  • 3 organic or biodynamic eggs

  • Handful of chopped rainbow chard, kale (stems discarded) or spinach leaves. Otherwise use yesterday's steamed broccoli or asparagus or some grated zucchini.

  • Handful of chopped fresh herbs - chives, parsley, dill or coriander all work well.

  • Generous dash of extra virgin olive oil

  • Salt and pepper

Method

  1. If time permits allow eggs to come up to room temperature.

  2. Crack eggs into a bowl and whisk well with a fork.

  3. Heat pan and add oil. Wait until the oil is hot and starts to shimmer.

  4. Add in chopped herbs and greens. Allow the greens to gently wilt.

  5. Add the egg mixture to the pan and wait until the sides begin to cook.

  6. With a wooden spoon gently push the egg in from the sides of the pan into the middle, allowing the egg to fold.

  7. Lower the heat to its lowest setting and repeat step 6 until you have ribbony folds of scrambled egg.

  8. Remove the eggs from the pan and serve.

Makes 1 large breakfast or lunch.

Chicken Bone Broth

Chicken-Bone-broth.jpg

Beautiful gut healing bone broth is simple to make, contains lots of nutrients and tastes delicious as it adds depth of flavour to your meals. 

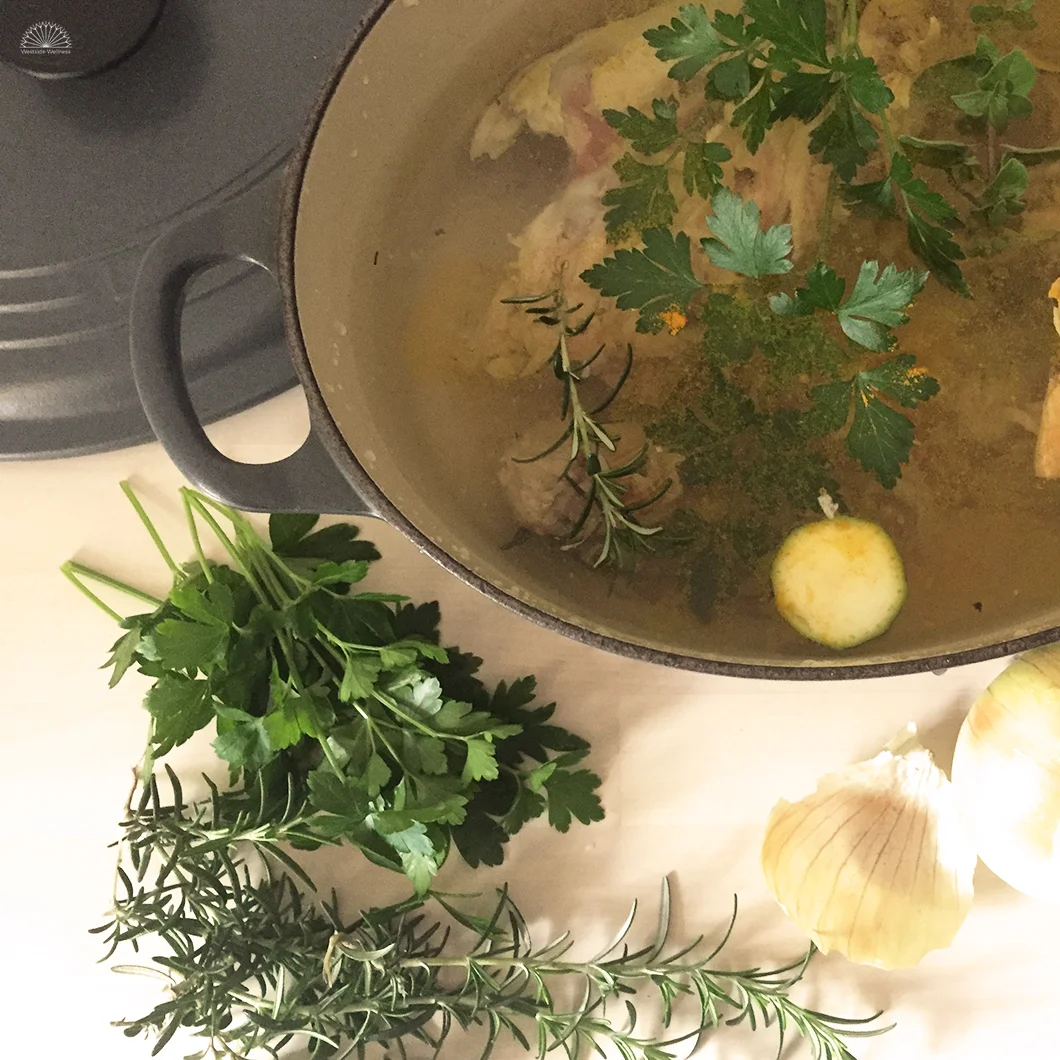
After roasting up a chicken (usually delicious turmeric roasted chicken) I'm left with the carcass and gristle. All I do is throw it in the pot with some herbs and leftover veggie scraps and boom - delicious bone broth is ready to add to my next soup, casserole or even cook some legumes or rice in. 

Just adapt the recipe to whatever herbs or spices you have on hand to make the whole processes even easier.

Why Bone Broth? 

Making bone broth is a wonderful way to extract the amino acids glycine, proline and glutamine from the collagen in a chicken carcass. Collagen is found in the tendons, ligaments and skin in animals - and is especially abundant in chickens. These amino acids are the building blocks of proteins found in cells in the body. Glutamine and gelatine found in bone broth is especially helpful at healing the lining of the digestive tract. 

Bone broth also contains many minerals and electrolytes including calcium, magnesium, potassium and sodium. These nutrients help to regulate fluid homeostasis in the body, provide cofactors for bone health and neurotransmitter production to regulate mood.  

Why Organic?

You will hear Renee and I talk about this a lot at Westside. When consuming meat it is important that you are choosing organic or biodynamic meat wherever possible.

Conventionally-raised animals are fed diets of grain and grasses that are sprayed with toxic herbicides and insecticides such as organophosphates (a known neurotoxin and suspected carcinogen). These chemicals are retained in animal tissue and not readily excreted meaning that when you eat a diet rich in conventionally-raised livestock you are also consuming these stored toxins.

Whenever possible also prioritise consumption of organic and biodynamic meat. 

A Word of Warning

Bone broth is not for everyone. It is high in sodium and potassium so people with impaired kidney function or hypertension should err on the side of caution by consulting a healthcare professional before adding this into their regular diet. 
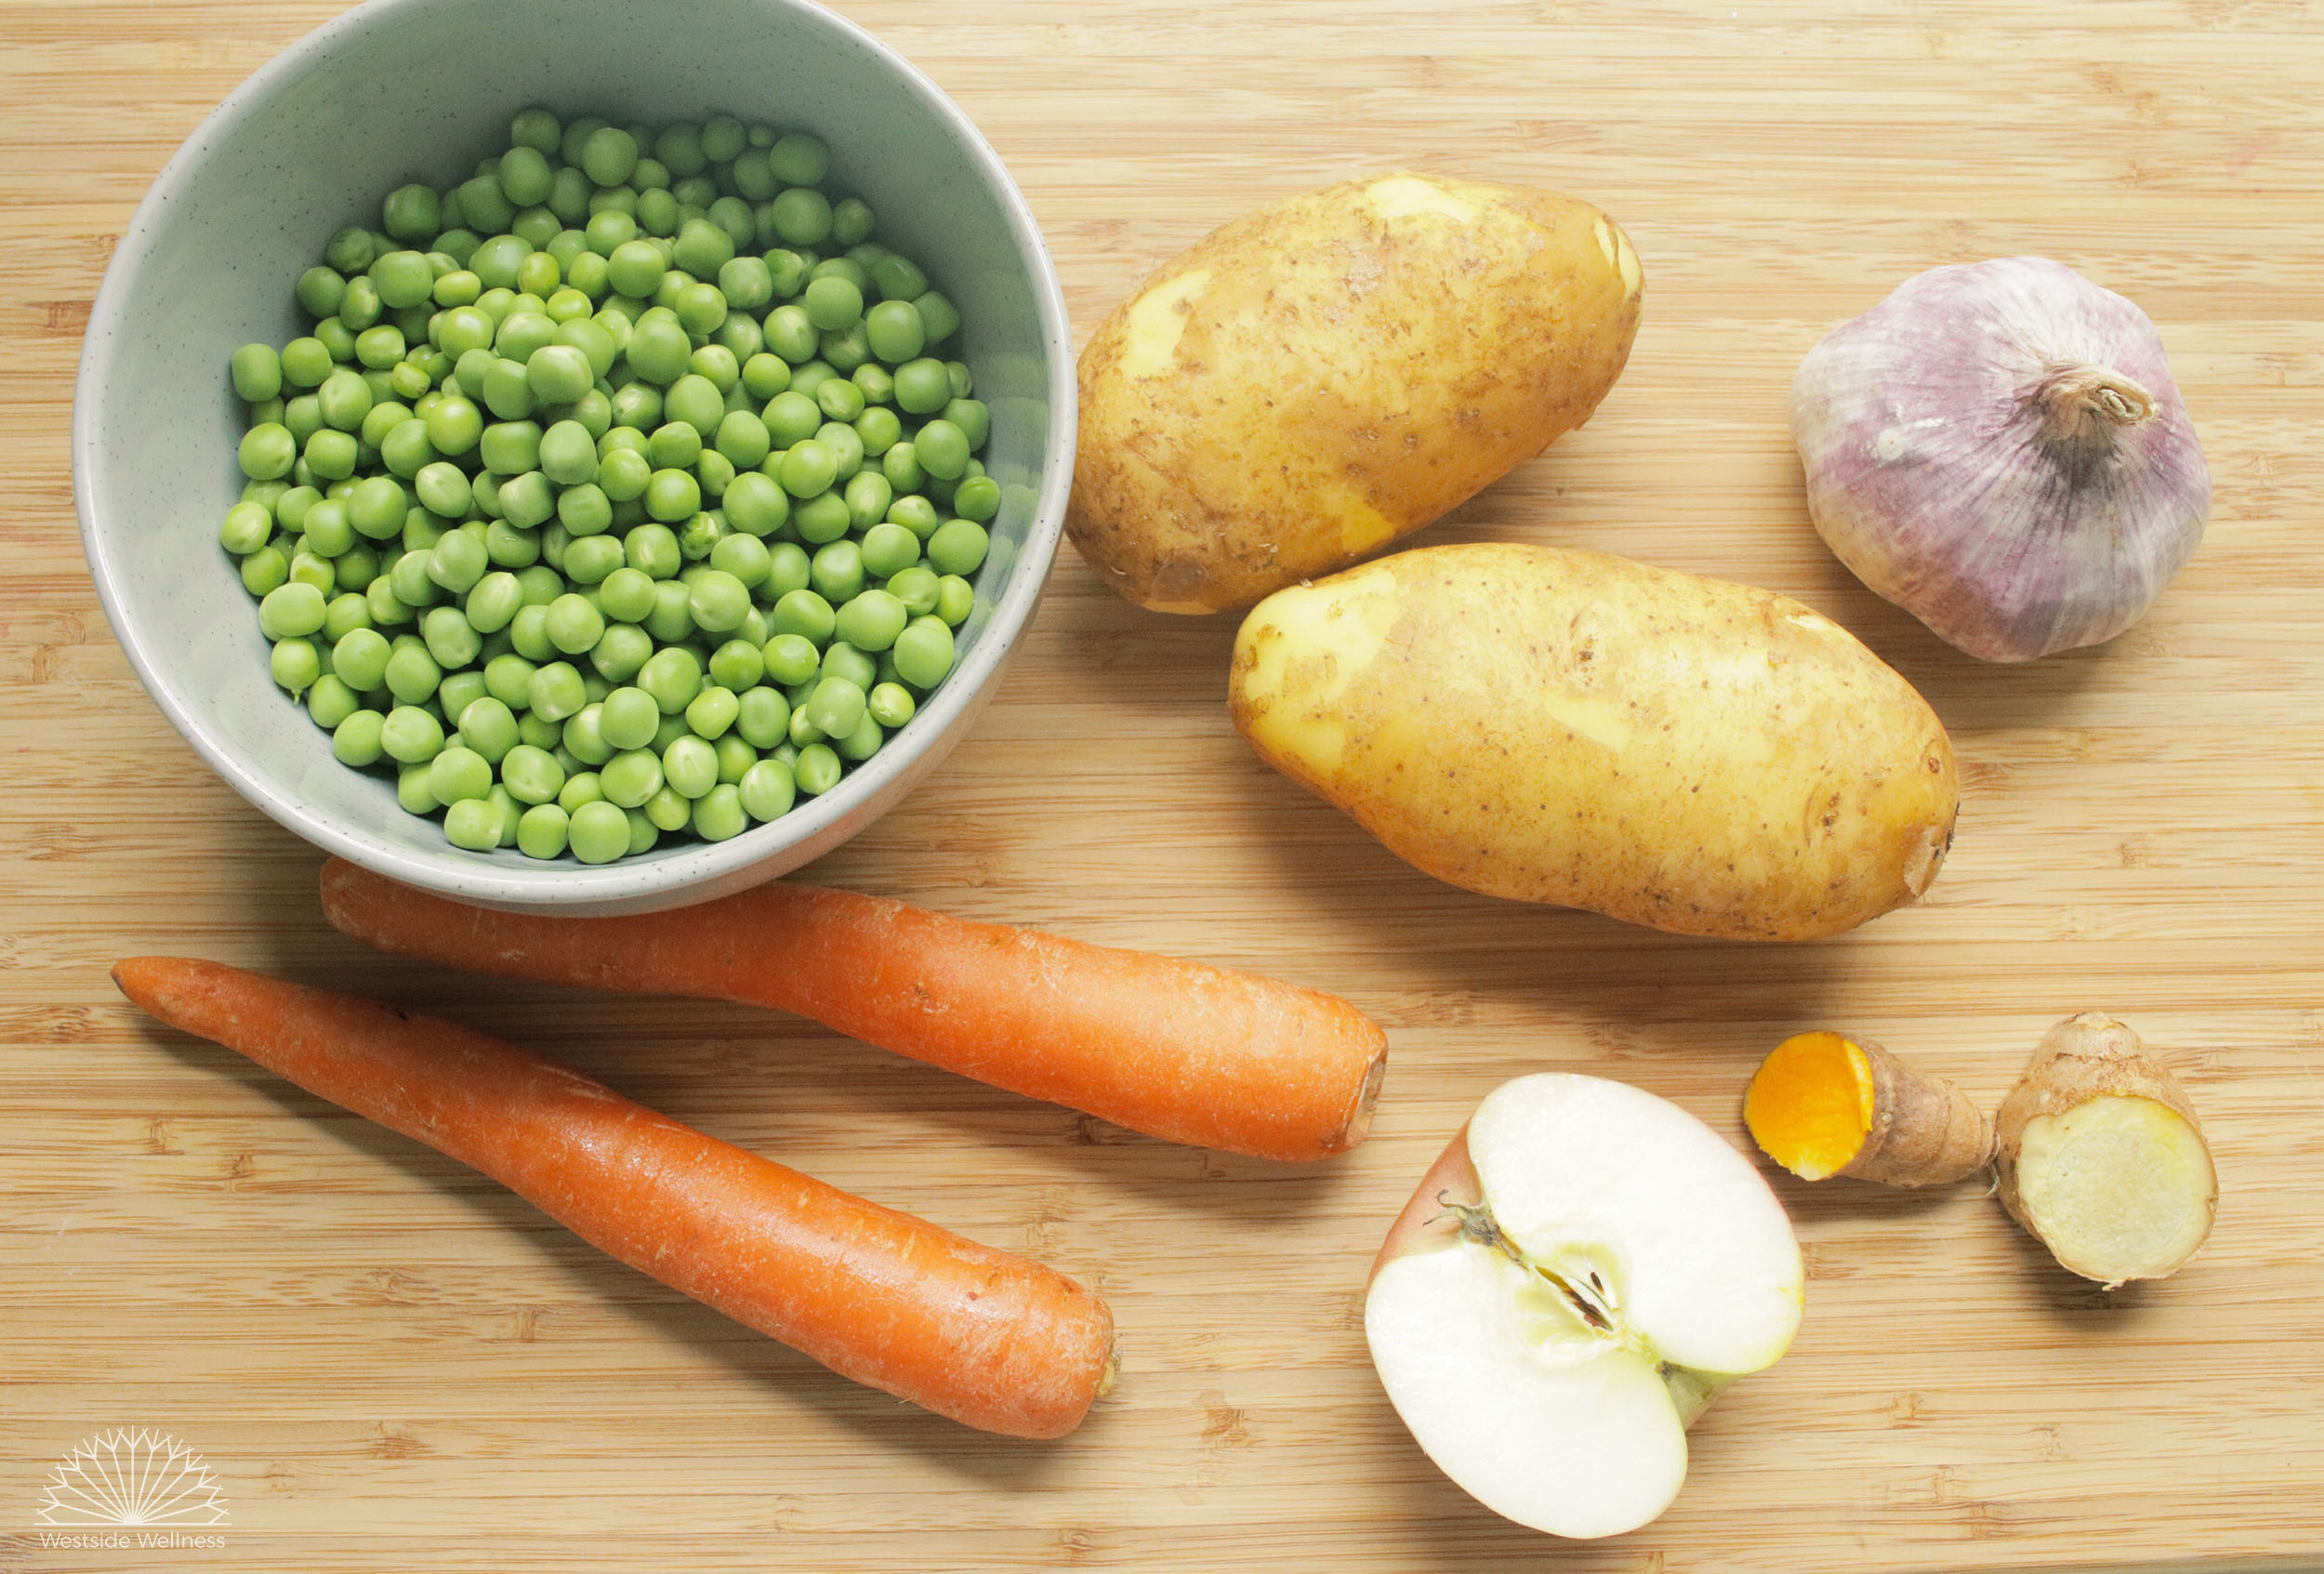
Ingredients

  • All the bones from a roasted organic or biodynamic chicken
  • 1 tsp apple cider vinegar
  • 6 black peppercorns
  • Handful of fresh or dried herbs: oregano, sage, parsley, thyme, rosemary etc...
  • Handful of veggie scraps: onion skins and tops, zucchini or carrot ends, celery sticks etc...
  • 1 tablespoon dried or fresh ginger or turmeric
  • 3.5L of filtered water
  • Pinch of sea salt (optional)

Method

  1. Add all ingredients to your stock pot or slow cooker. Allow to sit for 20 minutes for the apple cider to take affect and help the bones and cartilage to break down.
  2. Place the pot on the stove or in the oven and turn to the lowest possible heat. Alternatively set your slow cooker to low. Ensure the lid is properly covering your pot to prevent evaporation.
  3. Cook for 8-12 hours, checking every hour or so that the liquid has not cooked off. Ideally the pot should be bubbling very slowly.
  4. After 8-12 hours the ends of the chicken bones should crumble under slight pressure. This is when you know it is done.
  5. Strain with a muslin cloth or clean tea towel once the liquid is cooled.
  6. Store in glass jars. 

Bone broth lasts about 1 week when refrigerated or 3 months when frozen. 

Bone-broth.jpg

From Scratch Japanese Curry

japanese curry ingredients web vers.jpg

We love Japanese curry in our house! That slightly sweet, ketchup-y flavour, with the well balanced spices, oh my!
Once I realised that this was a veggie loaded meal that my kids would ACTUALLY eat, I knew that I had to get onto making it at home stat! When I started searching the internet for a reference recipe, pretty much all of them used store bought Japanese curry paste or powders, all of which had some not so favourable ingredients. It probably took about 6 tries to get that balance of flavour right, but I'm happy to say this recipe is very true to the flavour of restaurant curry.

You can add tofu, tempe, legumes like chickpeas or beef/chicken as your choice of protein. Like with most curries, this tastes best after it's been sitting in the fridge for a day or so. It freezes well but leave out the potato if you're going to freeze.

Happy eating! - Renee x

Serves 4-6
Prep time: 15 minutes
Cooking time: 50 minutes
Total time: 65 minutes

more curry ingredients web vers.jpg

CURRY INGREDIENTS

  • 4 cups of veggies, chopped into 1 cm cubes (peas, carrots, waxy potato are crucial but everything else is up to you)

  • 2 onions, finely chopped

  • 3-4 cloves garlic, finely chopped

  • 1 inch piece fresh ginger & turmeric

  • 2 apples, peeled and chopped into 1 cm cubes (Pink lady or Fuji are best)

  • 6 cups water (tap or filtered, not hot)

  • 2 tbs stock paste 

  • 2 tbs ketchup (we love Spiral ketchup)

  • 1/4 tsp ground cinnamon

  • 1 tsp ground cumin

  • 1 tsp garam masala

  • 1 tsp ground coriander

  • 1/2 tsp fenugreek seeds

  • 1/2-1 tsp salt + pepper to taste

  • 1 tbs apple cider vinegar (ACV)

  • 1 tbs tamari or coconut aminos

  • 1 tbs Worcestershire sauce (we love Melrose Worcestershire sauce)

  • 2 tbs toasted sesame oil

ROUX INGREDIENTS

  • 2 tbs tomato paste

  • 3 tbs tapioca flour/starch or corn flour

  • 1 cup of liquid from the curry

METHOD

  1. In a large pot, add the sesame oil and heat over a medium flame. Add the onions, garlic, ginger and turmeric and sauté for 5 minutes until the onions are translucent. 

  2. Add all of the remaining ingredients (not the roux ingredients though) and bring to the boil.

  3. Drop the heat to medium, cover the pot 3/4 with a lid and cook for 30 minutes, stirring occasionally.

  4. Keep the heat on the curry. In a small pot, whisk together the tomato paste and flour over a low heat. Add the cup of liquid from the curry and whisk over the heat, increasing it slightly until it starts to thicken. Once fairly thick (you still want it to pour off the spoon) add it to the curry and stir through.

  5. Cook the curry for a further 20 minutes. Taste and adjust seasoning as needed.

  6. In this last twenty minutes, cook/grill up your choice of protein. Chicken thigh or breast, tofu or tempe grilled in a little sesame oil goes well with this curry. Alternatively you could through in 1 1/2 cans of drained and rinsed chickpeas.

  7. Serve with cooked rice/quinoa/buckwheat.

chicken japanese curry web version.jpg
tofu japanese curry web vers.jpg

Vegan Raspberry & Nutella Raw Cheesecake

Raw Vegan Raspberry Nutella Chesecake

Raspberry, cashews and raw nutella - need I say more? Oh yes... it's also SIMPLE to make. At Westside, we love having raw desserts at our fingertips. It means less temptation for the more heavily-processed sweet foods you might purchase at a shop or cafe. 

For those nut-free folks out there you could look into swapping the cashews for 6 tablespoons of buckwheat grouts, soaked overnight. It won't have the same richness but it will give a similar texture. 

For the fructose-free people then swap the maple syrup and coconut sugars for rice malt syrup or a few drops of stevia. 

Enjoy xx Lucy

Ingredients for Filling:

  • Cashews x 1.5 cups, soaked for 6-8 hours
  • 3/4 cup extra virgin coconut oil, melted
  • 1/2 cup maple syrup
  • 1 tsp vanilla essence
  • 3/4 cup of raspberries, frozen or fresh
  • 1/2 cup coconut milk (make your own with this recipe, it's simple!)

Ingredients for Base:

  • 1 cup Hazelnuts, roasted
  • 1 cup desiccated coconut,
  • 1/2 cup coconut sugar
  • 1/2 cup raw cacao
  • Pinch of salt
  • 1/2 cup coconut oil, melted

Method:

  1. Combine all ingredients for the base in a high powdered food processor. Allow motor to run for 2 minutes or so, until the mixture is well combined. 
  2. Spread base mixture into the bottom or a springform pan or silicone baking dish.
  3. Put base into the freezer to cool.
  4. Strain water from cashews and add all filling ingredients to the food processor/thermomix and process until well-combined (about 5 minutes depending on the speed of your motor). Scrap down the sides of the mixing bowl as required.
  5. Spoon filling ingredients onto the cooled base and place cake into the freezer overnight to allow to set.
  6. Remove cake for the freezer and cut the cake into the desired pieces. You may like to allow it melt a little before eating to release more of the flavour.

Makes about 12 slices.

raspberry-nutella-raw-cheesecake

Not So Berry Teacake

beetroot and apple web vers.jpg

I don't know about other families, but my kids will positively rip through a box of organic frozen berries if they're in the freezer so I wanted to come up with an alternative to berries that I could use in desserts and smoothies. I start playing around with stewing apples and beetroot with citrus juice in order to create a faux berry flavour and it worked!

I do love a good hidden veggies recipe, and if its a sweet one too than it makes me even happier. Beetroot have exceptionally good nutritional value, and are a great source of fibre, folate,  manganese, iron, potassium and vitamin C, as well as potent antioxidants. They are also naturally sweet so a addition to sweet treats to help lower the added sugar.

Although this recipe is gluten and dairy free, you can sub the flours and milk for any that you like. Swap the nuts for sunflower seeds if it needs to be nut free, or omit altogether. Although cooking the apple and beetroot is a bit time consuming, you actually make enough for two cakes so you can freeze the other half for another time.

This teacake goes so well with a cup of tea on a lazy Saturday afternoon, however if you're a parent to young kiddos like myself, its realistically best eaten with one hand and a lukewarm cuppa in the other! Great for playdates and birthday parties too!

Enjoy! Renee x

Serves 8-10
Prep time: 15 mins
Total cooking time: 55 mins

INGREDIENTS

Not so berry mix:

  • 2 apples, peeled, cored and chopped into 1 cm cubes

  • 1 1/2 medium beetroot, peeled and chopped into 1 cm cubes

  • juice of 1 lemon (you will need to keep the zest)

  • juice of 1 orange (you will need to keep the zest)

Crumb mix:

  • 1 tbs coconut sugar

  • zest from above 1 lemon

  • 1/4 cup almonds/pistachios/pecans

Cake mix:

  • 1 1/4 cup plant based milk (rice, soy, nutmilk etc)

  • 2 tbs apple cider vinegar (ACV)

  • 1/2 cup coconut sugar

  • 1/3 cup coconut oil

  • 2 tsp vanilla extract/essence

  • 2 cups flour= 1 1/2 cup brown rice flour + 1/4 cup arrowroot/tapioca flour + 1/4 cup besan (chickpea flour)

  • 1/2 tsp baking soda (bicarb)

  • 1 1/2 tsp baking powder

  • 1/2 tsp cinnamon

  • 1/4 tsp salt

  • zest from above orange

uncooked berry cake web vers.jpg

METHOD

  1. Preheat oven to 180 degrees Celcius. Grease cake tin (I use a springform tin) and set aside.
  2. Place the apple, beetroot, lemon and orange juice in a small pan, cover with water and bring to the boil. Reduce the heat and cover with 3/4 with a lid. Cook for 20-25 mins until soft. Ensure that there is enough water at all times otherwise it will stick and burn.
  3. Pour off any excess water, puree and set aside. You will only be using half for this cake, the other half can be frozen for future cakes.
  4. While the beetroot and apple is cooking, combine the coconut sugar, lemon zest and nuts in a food processor until roughly chopped and set aside.
  5. Add the ACV to the milk and set aside.
  6. Cream together the coconut sugar, coconut oil and vanilla essence.
  7. Add the flours, baking powder and soda, salt, orange zest, and cinnamon and combine well. Pour in the milk + ACV mix and combine until smooth, ensuring there are no lumps.
  8. Pour batter into cake mix, giving a bang to get out any air bubbles. Gently add half the apple beetroot puree (freeze the other half for another cake), distributing it throughout the cake mix.
  9. Sprinkle the crumble on top of the cake, distributing it evenly.
  10. Cover the cake with foil, place in the oven and bake for 20 minutes. Remove the foil and bake for a further 10 minutes until a skewer comes out clean. Gluten free cakes can become quite dry if over baked, so ensure it isn't left in the oven for too long.
  11. Once cooked, remove from oven and allow to cool before serving.
slice of berry cake web vers.jpg

Homemade Face Cleanser

MAKING YOUR OWN CHEMICAL-FREE FACE CLEANSER IS EASY

Have you ever checked the ingredients of you favourite skin cleanser? Most of us would struggle to pronounce some of the ingredients, let alone know what they are or where they come from. 

Many substances used in skincare manufacturing (such as EDTA, sodium lauryl sulfate and formaldehyde) are harmful to our bodies. In many instances they are known carcinogens (substances known to cause cancer). 

You can avoid these harmful substances simply by making your own skincare products at home. It’s fast, cheap and so simple to do. 

I whip some a batch of this skin cleanser every month or so. It's gentle and effective, you can apply the product to the skin every day - it's both nourishing and deep cleansing to clear out clogged up pores. 

If you find the skin is too oily, simply cleanse you skin at night and by morning the oil will have absorbed into your skin, leaving it soft a smooth. 

ABOUT BENTONITE CLAY

Bentonite clay is formed by volcanic ash and contains many minerals including silica and magnesium. It acts to detoxify the pores of the skin due to it's difference in electrical charge. This assists it's drawing action to pull excessive oil and gunk from the pores to give you softer, smoother and clearer skin. To learn more about Calcium Bentonite (green clay) - we recommend reading more here

USING NON-METALLIC EQUIPMENT

Bentonite clay strips heavy metals from the body and from any minerals it comes into contact with….including your aluminium or stainless steel cookware.

INGREDIENTS

  • 2 tbs coconut oil Ÿ 
  • 2 tsp raw honey Ÿ-  I love this brand 
  • 1 tsp baking soda - this brand is great
  • 1 tsp bentonite clay Ÿ - I recommend this brand
  • 3 drops essential oil of your choice Ÿ- I love ylang ylang or geranium oil
  • Dried flower petals
     

METHOD

  1. Mix all ingredients in a non-metallic bowl and store in a glass jar.
  2. Leave ample room in the jar as the mixture will swell as the clay expands.

APPLICATION

  1. To use simply wash your face with warm water.
  2. Apply a small amount to the skin (about the size of a 20 cent coin).
  3. Massage into the skin and wash off with a warm wet face cloth. 

Keeps for up to 3 months in a sealed container. I prefer to use a glass jar for a container but you could also use a food grade plastic one. In the warmer months the oils will separate, simply stir to recombine.

0 Likes

Orange Coconut Body Scrub

Coconut-scrub-image.jpg

We make a lot of coconut milk at Westside Wellness! ....And that means lots of leftover coconut pulp. You can blitz the leftover pulp in a food processor or thermomix and then dehydrate it to make coconut flour, but because baking requires so little of it we often have more than we can handle. 

I like to use the leftover pulp to make body scrub - it really helps exfoliate dead skin from your pores but at the same time adds a fine coating of moisture to the skin to keep it nice a smooth. The orange rind adds a nice scent and provides a natural anti-microbial element to to the scrub to prevent unwanted skin infections.

Simply grab a handful and scrub onto to the skin (pay special attention to the knees, ankles, feet and elbows) while your in the shower. Wait a minute or two and then rinse off - enjoy!

INGREDIENTS

  • 1.5 cups of coconut pulp (from making homemade coconut milk)

  • 1 cup of salt

  • Grated rind of 1 orange

  • 1 tablespoon extra virgin olive oil

METHOD

  1. Combine all ingredients in a bowl.

  2. Store in 3 x 200mL jars. Keep 2 of the jars in the freezer for up to 2 months. The other jar can be kept in you shower to be used daily until finished, about 2 weeks.

The BEST Homemade Multipurpose Cleaner

Here at Westside Wellness, we think it's important to know exactly what goes into our cleaning products. Why? Because our skin and lungs are one of our major organs of detoxification/elimination and absorption. So whatever we come in contact with via our skin and lungs (through inhalation) is going to be processed by our body, which can lead to detrimental effects. 

Some cleaning products contain nasty abrasives, fragrances and whiteners to help give the appearance that they are 'doing a good job', but really what they are doing is providing an onslaught of nasties that we really don't want to be breathing in and touching. We also don't want these products entering our water ways where they cause massive detriment to the environment.

What's the solution? Enter our enzymatic, citrus cleaner. It is easy peasy to make, and a great way to reduce waste by reusing citrus peels (before they make their way to the compost). We use citrus peels and vinegar and let the combo ferment for 6-8 weeks. During this fermentation period, enzymes from the citrus peel is released and the mother from the apple cider vinegar and natural sugars from the citrus peel increases the fermentation resulting in a potent cleaning product! Now there are other recipes on the internet, using sugar and yeast, but for us this is way easier as we pretty much always have white and apple cider vinegar hand.

Once you get into the swing of things, you can have several jars on the go, staggered so you always have spray on hand.

INGREDIENTS

  • a wide mouthed, large glass* jar with lid

  • left over citrus peels- lemon, grapefruit, lime, orange etc **. Enough to fill said jar

  • 500-1000 ml white vinegar (enough to fill jar)

  • 2 tbs apple cider vinegar w/ mother

METHOD

  1. Thoroughly wash your jar in hot, soapy water. Rinse soap off well. 

  2. Cut your citrus peels into quarters.

  3. Place citrus peels in jar and pour in the white and apple cider vinegar. Push down the peels and make sure they are covered with liquid.

  4. Place lid on, write the date and put the jar in a dark, cool place. Leave for 6-8 weeks.

  5. Once fermented, pour your multipurpose spray into a spray bottle using a nut bag or muslin cloth to strain out any citrus flesh.

*Due to the enzymes release, it's best to use glass for both fermenting and to use as a spray. A little hack we discovered is that spray bottle guns fit most glass drink bottles that had a plastic lid!

**We keep our citrus peel in a container in the freezer until there is enough to fill a large jar.

citrus cleaner web vers.jpg