Mains

Hemp & Walnut Pesto

basil.jpg

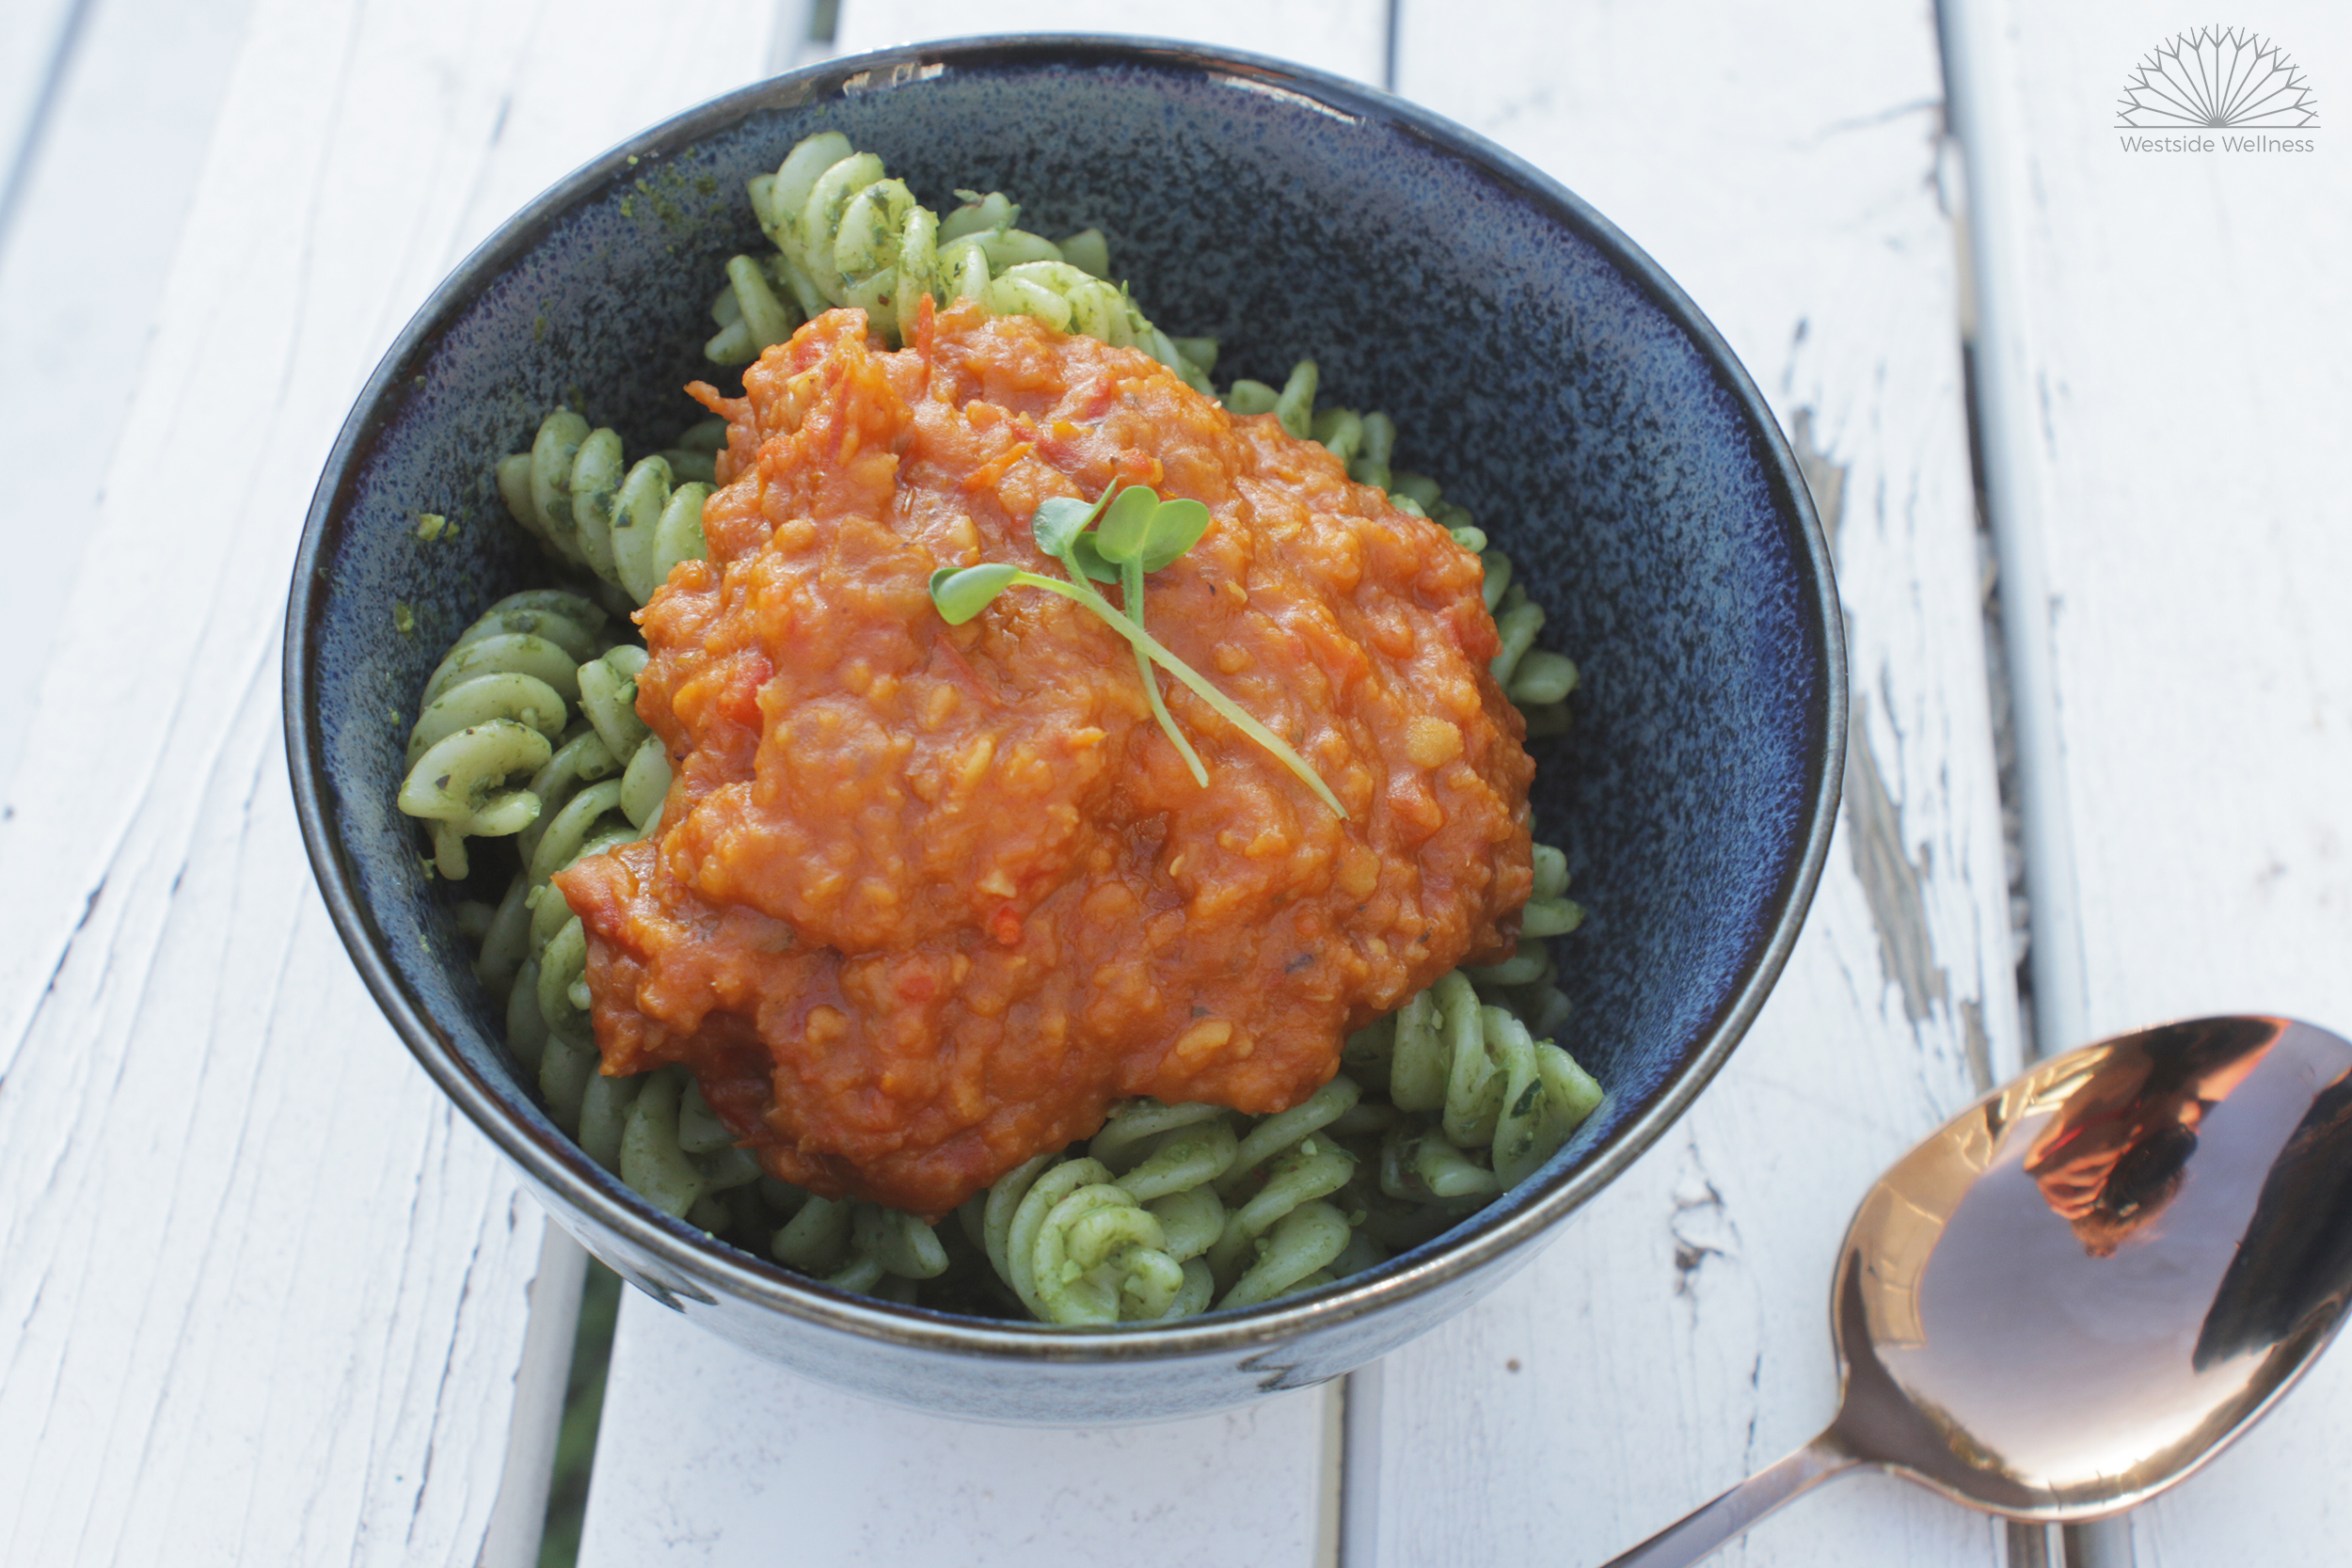
I have been obsessed with basil and pesto since I was a child; when I first tasted it I thought it was so gourmet! What a flavour sensation!

I make a whole variety of pestos, with or without basil, but I’ll admit basil pesto is my absolute favourite. Basil is in season for a fairly short period, so I always make a couple of batches for the freezer stash so I can continue to enjoy the delicious flavour until the next season.

One of the things that I love about pesto is that you can cram a whole heap of other stuff in there to make it not only taste great but to also boost the nutrient content. The idea for this hemp and walnut pesto came from needing more ways to help my clients who don’t eat much fish, or don’t like it, get more omega 3 into their day.

Hemp and walnuts are rich sources of alpha linolenic acid which is the type of omega 3 fatty acid found in plant based foods; once consumed it is converted to EPA and DHA or used by the body for energy (although by only a small amount). Omega 3 fatty acids are called essential fatty acids as we are unable to make them ourselves and need to consume them daily. Omega 3 fatty acids have anti-inflammatory properties and are needed for healthy brain, nervous system and eye function, among other things.

This pesto is a synch to make and can be frozen in smaller containers and ice cube trays to maximise the amount of serves and reduce waste. Enjoy!x

Make 2 small jars worth

Prep time: 5 minutes

Cooking time: 2 minutes

Total time: 7 minutes

INGREDIENTS

  • 1/4 cup hemp seeds

  • 1/4 cup walnuts (purchased in the shell is best)

  • 1/4 cup sunflower seeds

  • 1 bunch parsley, washed and roughly chopped

  • 2 bunches basil, washed with leaves removed from stalks

  • small handful fresh oregano

  • 2 cloves garlic, finely chopped

  • juice of 1-2 lemons

  • 1-2 tbsp olive oil

  • 1/2 tsp salt

  • couple of cracks of black pepper

METHOD

  1. Add the hemp seeds, sunflower seeds and walnuts to your food processor/thermomix/blends and process until well broken down.

  2. Add the fresh herbs, garlic, salt, pepper, juice of 1 lemon and 1 tbsp of olive oil.

  3. Combine until you achieve the desired consistency (smooth or a little chunky), scraping down any unprocessed bits and pieces to ensure everything is broken down.

  4. Taste and adjust seasonings, adding extra salt or lemon juice for taste and additional olive oil 1 tbsp at a time to make the mixture thinner if necessary.

  5. Store in an airtight container, banging out any air pockets. Cover the pesto with a layer of olive oil which will assist with preserving it. It will last 5 days or so in the fridge if always covered with a layer of olive oil.

  6. Freeze in small containers or ice cube trays to prolong the shelf life and defrost in the top shelf of your fridge as needed.

Pumpkin, Ginger & Parsnip Soup

pumpkin-soup-headonweb.jpg

Soup is our go to make in advance meal in our house, I generally pick the busiest night of the week (usually when we have swimming) to ensure a batch is sitting in the fridge waiting to be heated and served in under 5 minutes. Pumpkin soup is my go to for cramming a ton of veggies into it, because if it’s orange and slightly tastes like pumpkin my kids will actually eat it!

This soup was created after I realised that no one in the house except me was going to eat parsnip, one day I chucked some in with a batch of soup and the end result was this delightfully creamy soup without a dash of dairy added to it. Personally, I love the carrot-y (they’re actually related to carrots and parsley!), nutty flavour and love adding them to vegetable mash or eating them roasted with olive oil and spices. Nutritionally, they contain a plethora of important minerals (calcium, iron, zinc and potassium), vitamins (vitamin C & K, folate, B6 and B5) and are rich in antioxidants and fibre (both insoluble and soluble).

This soup also contains broccoli stalk, which is also super nutritious but tends to get chucked out once the florets have been eaten. You won’t even notice it’s there will get extra nutrition as a result AND you’ll be reducing food waste at the same time, win win!

This soup will last 4-5 days once made, and freezes well. Enjoy! -Renee x

pumpkin-parsnip-ginger-web.jpg

Serves 4
Prep time: 
10 minutes
Cook time: 30 minutes
Total time: 40 minutes

INGREDIENTS

  • 1 onion, finely chopped

  • 3-4 cloves garlic, finely chopped

  • 1 inch fresh ginger, finely chopped

  • 1/2 inch fresh turmeric, finely chopped or 1/2 heaped tsp ground turmeric

  • 2 celery sticks, finely sliced

  • 1 large parsnip, cut into 2 cm pieces (approx. 300-400 grams)

  • 1/2 medium butternut pumpkin; skin off, seeds removed and cut into 2 cm pieces (approx. 500 grams) (you can also use Jap pumpkin too)

  • 1 1/2 tbs stock paste or powdered stock

  • 3/4 cup split red lentils, rinsed and washed thoroughly

  • 4 cups water (tap or filtered, not hot) or bone broth (just omit the stock paste)

  • 2 tbs olive oil

  • 1 broccoli stalk, roughly chopped

METHOD

  1. In a large pot, heat the olive oil over a medium heat. Add the onions, garlic, celery, ginger and turmeric and sauté for 5 minutes until translucent.

  2. Add remaining veggies and sauté for another 2 minutes.

  3. Chuck in the remaining ingredients and bring to the boil. Drop the a medium heat, pop the lid on and cook for 25 minutes, stirring occasionally.

  4. Once cooked, taste and adjust seasoning as needed. Puree the soup with either a stick mixer or by processing in a blender/food processor/thermomix. Add extra water 1/2 cup at a time to reach desired consistency.

  5. Top with our sumac seeded dukkah or cashew pesto. Serve as is or with a slice of toasted mountain bread, sourdough or gluten free bread.


pumpkin-parsnip-soup-web.jpg


Oven Baked Paleo Meatballs

I’ll be the first to admit, I’m not very good at cooking ‘simple’ or one pot/pan dinners. I go in with a simple idea and often complicate it by adding an extra dish or experimenting with a new technique and before I know it, I’ve used a billion dishes, pots and pans.

I created this meatball recipe with the goal of creating a one pan dish and I’m pleased to say that I finally succeeded! This is something I make for the family once a week, loading up the tray with meatballs and homemade chips and then serving salad on the side. The leftover meatballs are perfect with an egg or two for breakfast the following morning or thrown together with salad or steamed veggies for a quick and nutritious lunch.

This recipe is gluten and grain free so perfect for those with intolerances or who follow a paleo diet, and can be adapted for those with nut allergies or fructose malabsorption. You can throw these together in under 10 minutes and cook or place in the freezer for an even quicker meal down the track. Enjoy! -Renee

paleo meatball ingredients.jpg

Makes: 18 meatballs

Prep time: 5 minutes

Baking time: 30-40 minutes

Total time: 45 minutes

INGREDIENTS

  • 500 g mince

  • 3/4- 1 cup almond meal*

  • ½ tsp ground turmeric

  • ½ small onion, finely diced**

  • 2 cloves garlic, finely chopped**

  • 1 egg

  • ½ zucchini, grated

  • 1 tbs tomato paste

  • salt and pepper to taste

  • large handful of fresh parsley, finely chopped

  • 1 tbs olive oil

*Swap for regular breadcrumbs if your prefer, or rice crumbs if you are allergic/intolerant to nuts

**Omit if you are have issues with high FODMAP foods or onion and garlic

cooked paleo meatballs.jpg

METHOD

  1. Preheat oven to 180 degrees Celsius. Line a baking tray with baking paper and set aside.

  2. Heat the olive oil in a non-stick pan and sauté the onion and garlic for 5 or so minutes until translucent.

  3. In a bowl, combine all of the ingredients until well mixed. If the mixture if a little wet, add extra almond meal 1/4 cup at a time.

  4. Form the mixture into golf sized balls (you should get 18-19 meatballs) and place on baking tray.

  5. Place the baking tray in the oven and bake for 20 minutes. Remove the tray from the over briefly, to turn the meatballs so they brown on the other side and bake for a further 15-20 minutes until the top is golden brown.

  6. Serve with salad and homemade chips, pasta/zoodles and sauce or eat with eggs for breakfast. The possibilities are endless!

hand grabbing meatball.jpg
meatballs & slaw.jpg

Salmon Patties

I have been making these patties for quick some time now, and created the recipe as a way of getting more calcium into my kids diet (we eat little dairy and don’t drink milk) and help the family move away from eating tuna on a regular basis (tuna is higher in mercury due to their large size).

For me, eating tinned salmon with the bones and skin is the ultimate in reducing waste, using the ‘whole’ animal and boosting the nutrition of meals. One of the questions I get asked every.single.time when I talk about reducing consumption of dairy or encounter clients with dairy intolerances or allergies, is where will I get calcium?

Calcium is an important nutrient, not only for bone health but also for cardiovascular, muscular and nervous system function. Yes, dairy is a source of calcium, but it is not the only source nor is it the best source. Many foods, including plant based foods, are abundant in calcium, including:

  • salmon and sardine bones

  • broccoli, kale and leafy greens

  • almonds, cashews and other nuts

  • tahini

  • tofu

  • chia seeds

  • legumes

  • dried figs

These salmon patties are an absolute sinch to make, my kids have NO IDEA there are salmon bones in them and you can make them in advance and reheat or freeze for another day. Enjoy!

xRenee

Tinned salmon bones are an excellent source of calcium

Tinned salmon bones are an excellent source of calcium

INGREDIENTS

  • 400 g tin pink or red salmon, drained (keeping the skin and bones)

  • 2 celery sticks, finely chopped

  • 1 cup almond meal

  • Juice of half lemon

  • 2-3 cloves garlic finely chopped

  • 1 small onion, finely chopped

  • handful fresh parsley and chives, finely chopped

  • salt and pepper to taste

  • 2 eggs

  • coconut oil for cooking

celery and onion cooking web.jpg
  1. Heat a little coconut oil in a frying pan and sauté the onion, garlic and celery for 5 minutes or so.

  2. Mash the salmon with the bones, getting in there so that all bones are broken down. This is particularly important for fussy eaters who may notice the bones!

  3. Add the remaining ingredients, except the coconut oil, in a bowl and combine until it all sticks together. Form into golf ball sized balls.

  4. Heat 1 tbs coconut oil in a non-stick pan and add 3-4 patties. Flatten with the back of a spatula and cook until golden brown and then flip to the other side. If they stick when trying to flip, you just need to cook that side a bit longer.

  5. Serve with salad and/or steamed veggies


salmon patties vers 2 IG.jpg

Veggie-Loaded Lasagne

vegetarian-gluten-free-lasagne

We are gluten and dairy-free at our house due to our youngest child having food intolerances. Fortunately there are many wonderful recipes out there that can mean you can still enjoy foods like pasta and lasagne even when you can't eat gluten. 

I've adapted this recipe from The Healthy Chef and tweaked it for our household's dietary needs. I recommend making the basic recipe below and then once you've got the hang of this go ahead and adapt it to your own palate preferences.

Ingredients

  • 1.5L x tomato passata
  • 1/3 cup of red wine
  • 1 x brown onion, diced
  • 2 x cloves of garlic, finely chopped
  • 1 x tin of brown lentils, strained (or 3/4 cup of rinsed red lentils)
  • 1/2 bunch of basil leaves, chopped
  • 1 x bunch of greens (kale, Swiss chard or spinach greens), washed and chopped
  • 2 x tbs Extra virgin olive oil + extra for roasting pumpkin
  • 1 x small butternut pumpkin, seeded and sliced thinly widthways 
  • 1 x tsp of ground cinnamon 
  • 1 /2 x tsp of ground nutmeg
  • 2 x cups of raw cashews, soaked for 2 hours
  • 1/2 cup of nutritional yeast
  • 1 x cup of water
  • Sprigs of rosemary or thyme for roasting (optional)
  • Salt and pepper for seasoning

Method

  1. Soak raw cashews in water (or speed up the process by soaking in freshly boiled water while you start the cooking process).
  2. Preheat oven to 180C fan-forced.
  3. Place sliced pumpkin on a baking tray and sprinkle with ground cinnamon, nutmeg and prigs of rosemary/thyme if using. Drizzle with 1 x tbs of olive oil. Roast for 20 minutes until golden and pumpkin is cooked (roast for longer if needed).
  4. Heat remaining 1 x tbs of olive oil in a small heavy based saucepan while the pumpkin is cooking. Once the oil is heated add chopped onion and cook over medium heat until translucent and slightly caramelised. Add garlic, lentils and salt and pepper. Stir to coat.
  5. Add tomato passata and red wine. Stir together and reduce heat to simmer on low for 20 minutes to allow flavours to develop. Throw in chopped basil leaves at the end of cooking the tomato sauce. 
  6. Sauté greens in a small amount of oil or water until bright green.
  7. Strain cashews and blend on high with water, nutritional yeast, salt and pepper until combined into a smooth paste. 
  8. Assemble the lasagne in an oven-proof ceramic dish starting with pumpkin, then greens, followed by tomato sauce. Repeat and then top with the cashew paste.
  9. Bake lasagne in the oven for 30 minutes until cashew layer becomes a crust on top.

Serves 8.

Enjoy! Lucy x

pumpkin-veggie-loaded-lasagne

Quick & Easy Baked Eggs

baked eggs ingredients web.jpg

In a lot of ways, I can't believe I didn't create this recipe sooner! It contains pretty much most of my favourite ingredients, and I bloody well love a hearty savoury breakfast!

Although it seems indulgent and time consuming, I reckon that baked eggs is something you can enjoy any day of the week, as it only takes a few minutes to prepare and is then baked in the oven for 20 minutes. Prep it, wack it in the oven, get ready for work or your day then enjoy!

There's so many variations for this too, you could add chopped leafy greens or mix in our 'Hidden Veggies Baked Beans'. If you eat dairy, a little feta or goats cheese would be absolute perfection as well. I hope you enjoy my baked eggs as much as I do x

Prep time: 5 minutes

Cooking time: 20-25 minutes

Serves 2

uncooked baked eggs website.jpg

INGREDIENTS

  • 4 eggs (organic and free range is always best)

  • 1 medium sweet potato, sliced into 1 cm thick disks

  • 6-8 cherry tomatoes, halved

  • 1/2 red onion, finely chopped

  • salt and pepper to taste

  • drizzle of balsamic vinegar

Optional toppers: sliced chilli, chopped fresh chives and parsley, feta, goats cheese

METHOD

  1. Preheat your oven to 180 degrees Celsius. Grease a deep baking dish with a little olive oil and set aside.

  2. Place the sliced sweet potato into the baking dish, close together without overlapping.

  3. Crack the eggs on top of the sweet potato, fairly close together.

  4. Sprinkle the cherry tomatoes, drizzle on some balsamic vinegar, add a few cracks of salt and pepper and place baking tray in the oven.

  5. Bake for 20-25 minutes until whites are cooked and a glaze is over the whole egg.

  6. Add any of the additional toppers on top when serving.

Meat-free Monday Bolognese Sauce

jar of veggie bolognese web.jpg

My family and I love pasta and eat some form of bolognese pretty much every week. I love making it because its a great way to clear out the fridge of any scrappy or limp looking veggies, and I can cram a ton of vegetables in there that my kids wouldn't normally eat.

This is one of my favourite versions for two reasons:

1. It has split red lentils in it, and I absolutely LOVE these bad boys. Split red lentils are an excellent source of fibre, protein and magnesium as well as other vitamins and minerals. They also break down really well so can be easily hidden in meals for fussy eaters (i.e my 5 year old!)

2. It has eggplant in it. I don't know about anyone else, but I always buy eggplant and never get to use it because my kids won't eat where it has obviously been added. In this dish, it is completely broken down and hidden, but adds fantastic flavour. Eggplant are also a great source of fibre, copper and B1, as well as a good source of manganese, B6, B3, potassium and vitamin K.

This makes enough for 6-8 serves, when I make it I immediately freeze half for a quick meal later down the track. If you don't want to freeze it, just half the recipe.

I hope you enjoy this meat-free Monday meal!

Prep time: 10 minutes

Cooking time: 35 minutes

Serves 6-8

Freezes well

other veggie bolognese ingredients web.jpg

INGREDIENTS

  • 1 small eggplant, skin removed and cut into 1 cm cubes

  • 1 celery stalk, finely chopped

  • 1 onion, finely chopped

  • 3-4 cloves garlic, finely chopped

  • 1/2 carrot, grated

  • 1/2 medium red capsicum, finely chopped

  • 1 largish handful fresh oregano, marjoram and parsley (use 1 tsp of each dried)

  • 3/4 cup split red lentils, well rinsed

  • 500 g crushed tomatoes, salt reduced

  • 2 tbs tomato paste

  • 1 tbs apple cider vinegar

  • pepper to taste

  • 1/4- 1/2 tsp salt 

  • 2 large handfuls leafy greens, finely chopped

  • 1 tbs olive oil

METHOD

  1. Heat the olive oil in a large pot. Add the onions, garlic and celery and sauté for 5 minutes, stirring occasionally. 

  2. Add the remaining ingredients and stir to combine. Fill the empty tin or jar of crushed tomatoes 3/4 full of water, shake it to loosen all the tomato-ey goodness inside and tip that in as well.

  3. Bring to the boil, then drop to a medium heat and cook for 30 minutes. Stirring occasionally.

  4. Add the chopped leafy greens and cook for another 5 minutes.

  5. To make this a completely hidden veggies meal, take to the pot with a stick mixer or potato masher and process until the texture is to your liking.

  6. Serve with pasta, rice, buckwheat, quinoa or zoodles. This is also a great base for lasagne, Sheppard's pie or can be used as a base for our 'Veggie Loaded Mexi Beans'

veggie bolognese web.jpg

Veggie Loaded Chilli Beans

beans and rice web.jpg

If there is one meal that I make that I can guarantee that my kids will eat, it is this one! My 2.5 year old particularly loves it and will usually eat 2-3 serves (yay!).

I do this hidden veggies style by processing the mix before adding the beans in my thermomix, but it is just as delicious with chunky style veggies. You can also sub the black beans for red kidney or white beans, they all work well and have similar nutritional profiles.

My veggie loaded chilli beans is a great one to double and freeze half for a rainy day. You can serve it brown rice or make into burritos/tacos with mountain bread, tortillas (we use these ones), or lettuce. Add chilli at the end if you're a fan too!

Renee

Serves 4
Prep time: 
15 minutes
Cooking time: 45 minutes
Total time: 1 hour

chilli beans ingredients web.jpg

INGREDIENTS

  • 1 onion, finely chopped

  • 3-4 cloves garlic, finely chopped

  • 1 tin crushed tomatoes (salt reduced is preferable)

  • 2 tbs tomato paste

  • 1 1/2 tbs apple cider vinegar (ACV)

  • 1/2-1 tsp salt + pepper to taste

  • 1 small red capsicum, chopped into 1 cm pieces

  • 1 medium carrot, grated

  • 1 medium zucchini, grated

  • 1 celery stick, finely chopped

  • 2 handfuls leafy greens, finely chopped

  • 2 tbs 'chilli-mix'

  • 2 tins black beans, drained and rinse well (alternatively 1 cup of dried beans, soaked and cooked). You can also use a combination of different beans, I love combining black beans with 3 bean mix

  • 2 tbs olive oil

METHOD

  1. Heat the olive oil in a large pot or wok (using a wok works a treat!) over a medium heat, add the onions and sauté for 5 minutes until translucent.

  2. Add the garlic and all the veggies, except the leafy greens and cook for another 5 minutes.

  3. Pour in the crushed tomatoes, then half fill the tin with water and shake well (to remove all the tomatoey goodness) and pour in as well. Add the tomato paste, ACV, spices and 'chilli mix', combine well and cook over a medium heat for 40 minutes.

  4. Chuck in the leafy greens and process with a stick mixer/thermomix/food processor if you want to hide those veggies (I do!) and then add the beans and cook for another 5 minutes. Taste and adjust seasonings if needed.

  5. Serve with cooked rice, quinoa or buckwheat, homemade tortillas or mountain bread and some chopped up lettuce. Other tasty additions include guacamole, coleslaw and slices of lime.


chilli bean taco.jpg
lettuce burrito web.jpg

Beef Tagine

beef-tagine-westside-wellness

There is something sublime about slow cooked beef - it tastes so rich and is full of flavour. This recipe is no exception with it's intense spices, herbs and citrus notes. I've adapted the recipe from the wonderful Neil Perry who's recipes I cannot seem to get enough of.

As always I recommend using biodynamic or organic beef to limit exposure to toxins stored in the fats of livestock. 

Also this recipe is not exact - you can play with the flavours to have fun while cooking - just add and subtract according to your own palate and what's spices you have on hand in the cupboard.

Ingredients

  • 1.5kg oyster blade, diced into large chunks
  • 1 tbs extra virgin olive oil
  • 1 x 400g tinned whole tomatoes (or 1 x jar of BioNature organic tomatoes which we love at Westside!).

Chermoula 

  • 1/2 bunch of coriander
  • 1/2 bunch of flat leaf parsley 
  • 1 purple (Spanish) onion, roughly chopped
  • 3 cloves of garlic
  • 1 tbs of ground turmeric
  • 1 tbs extra vigin olive oil
  • 1 tbs garam masala
  • 1 tsp smokey paprika 
  • 1 tsp ground ginger
  • 1 tsp ground cumin
  • 1 tbs whole coriander seeds
  • Juice and rind from 1 orange
  • 1 tsp of chilli flakes (optional)

Method

  1. Add all the chermoula ingredients to a food processor or blender and process until smooth.
  2. Marinate the beef in a large bowl covered in the chermoula for about an hour. Leaving it on the bench top covered during this time to allow the flavours to infuse.
  3. Preheat the oven to 170C.
  4. Place your dutch oven or large casserole dish brown on a medium heat on the stove top. Add olive oil and heat until shimmering. Add the beef (retain the remaining chermoula liquid in the bowl) and brown the meat until sealed on all sides (this retains the flavour).
  5. Add the tinned or jarred tomatoes to the remaining chermoula liquid in the bowl. Stir and then add this sauce to the beef.  Mix well. 
  6. Place the dish, covered, in the oven and cook for 2-2.5 hours. Check the dish once or twice to make sure that liquid hasn't cooked off and to stir the beef to prevent from sticking to the bottom. 
  7. Serve this meal with brown rice or quinoa. Sprinkle the dish with chopped parsley or coriander before serving.

Serves 5

Enjoy! x

Beef-tagin-web.jpg

Slow Cooker Chickpea and Pumpkin Curry

butternut pumpkin.jpg

We love slow cooker curry in our house and easily eat one every week. I love being able to chuck something on first thing in the morning and know that all I need to do for dinner that night is cook some rice (I often do that in advance and freeze it too, saving even more time!).

This slow cooker chickpea and pumpkin curry is slightly sweet, creamy and very mild and a huge hit with my kids, especially my 2.5 year old who will ask for curry for days after we've had this one. Chickpeas are a fantastic source of fibre and magnesium, two nutrients most of us need extra of! The spices are great for settling tummies and reducing inflammation and the veggies are generally the cheapest you can get, making this a very cheap (and nutritious!) family meal.

It freezes well (minus the potatoes) and tastes even better when kept in the fridge for a few days before eating. I hope you enjoy my favourite slow cooker curry! x

chickpeas ginger IG.jpg

Serves 4-6

Prep time: 10 minutes

Cook time: 30 mins in a hurry; 6 hours slow cooked

INGREDIENTS

  • 1 onion, chopped

  • 4-6 cloves of garlic, finely chopped

  • 1 inch piece of ginger, peeled and finely chopped

  • 1 inch piece of fresh turmeric, peeled and finely chopped (OPTIONAL but delicious)

  • 1 medium potato, washed and cubed

  • roughly two cups butternut pumpkin, cubed

  • 1 medium zucchini, cubed

  • 1 tin diced tomato (salt reduced)

  • 1 tin coconut cream

  • 1 tin chickpeas, drained and rinsed well (or 300 g pre-soaked and cooked chickpeas)

  • 1 tbs sesame oil

  • 1/2 tsp salt

  • few cracks of pepper to taste

  • 1 ½-2 tbs curry powder

  • 1 tsp stock paste

  • couple handfuls of chopped greens like kale or silverbeet

curry spices.jpg

METHOD

  1. Heat the sesame oil in a pan, add the onion, garlic, ginger and turmeric. Sauté on a medium heat until the onion is translucent (approx. 5 minutes). This step intensifies the flavour, but can be totally skipped if your in a hurry.

  2. Set up your slow cooker*. Chuck in the cooked onion mix, and the rest of the ingredients, and combine well.

  3. Cook for 6 hours on low heat (stir occasionally to prevent the sides drying out). Chuck in the chopped greens in the last 10 minutes or so and mix through. Serve with cooked brown rice, quinoa or cauliflower rice. A dollop of natural yogurt goes very well with this too!

*If you don’t have a slow cooker, this can easily be slowed cooked in the oven at 180 degrees for 1 ½-2 hours, just chuck it in a casserole dish or dutch oven (you will need to stir occasionally). It can also make a pretty quick meal by cooking on the stove top in a large pot. Follow step one, then add the veggies and sauté for a few minutes. Add the remaining ingredients, bring to the boil, reduce heat and simmer for 30 minutes. It’ll be tasty but the flavours won’t be as rich.

slowcooker chickpea curry.jpg

Cuban Black Beans

Cuban-beans-web.jpg

This recipe has been perfected by my beautiful best friend and husband, Aaron. He's adapted it over the years and tweaked it here and there. The thing I love most about this meal is that it lasts for 5 days in the fridge, and can help to add extra flavour and substance to other meals (even bolognese sauce!).  

It's best served with Spanish rice (recipe to follow) or with a fried egg and guacamole with salsa. 

Black beans are full of prebiotic fibre which helps to feed the beneficial bacteria of your large intestine. They are also a wonderful source of amino acids - particularly important when you are vegan or vegetarian and need to meet your daily protein intake.  

Ingredients

  • 2 cups dried black beans + reserve water from cooking
  • 1 tsp cumin seeds
  • 1 bay leaf
  • 1 tbs apple cider vinegar
  • Generous slug of extra virgin olive oil
  • 1 carrot, chopped into small discs
  • 1 red onion, sliced lengthways
  • 3 cloves of garlic, finely diced
  • 1 fresh jalapeño, finely diced
  • 1/2 green capsicum, diced 
  • 1 ear of corn, kernels removed
  • 2 tomatoes, medium sized, chopped
  • 1 tbs tomato paste
  • 1 tbs mixed herbs
  • 1 tbs cumin powder
  • 1/2 bunch of fresh coriander, chopped
  • Pinch of salt
  • Optional: 1 of the following dried chilis: pasilla, guajillo, chipotle

Method

  1. Soak beans and cumin seeds in plenty of water overnight (approx. 8-10 hours)
  2. Strain and discard water.
  3. Place beans, salt, bay leaf and dried chilli (optional) in a large stainless steel pot and cover with water.
  4. Bring beans to the boil and then simmer for 30-40 minutes until beans are almost cooked through.
  5. Strain beans BUT reserve cooking water.
  6. Using the same pot return to the stove (medium heat) and add oil. After heating oil add onions and cook until translucent. Then add jalapeño and garlic, and cook for 5 minutes. 
  7. Then add tomato paste, cumin powder and mixed herbs, coat the onion mixture. Keep stirring until the mixture begins to dry (approx. 3 minutes). 
  8. Add strained beans, carrot, apple cider vinegar and lime juice to the pot. Then add enough of the reserved cooking water to reach the level of the bean mixture in the pot (about 1.5 cups depending on the size of your pot).  
  9. Cook bean mixture for 10 minutes.
  10. At this point check that the beans or properly cooked through. If not continue to cook until the beans are nicely soft (you may need to add more reserve cooking water if the mixture is drying). 
  11. Add coriander, chopped tomatoes, caspcium and corn. Cook for a further 10 minutes.
  12. Serve warm with Mexican rice and soft shell tacos.    

Serves 8.


From Scratch Japanese Curry

japanese curry ingredients web vers.jpg

We love Japanese curry in our house! That slightly sweet, ketchup-y flavour, with the well balanced spices, oh my!
Once I realised that this was a veggie loaded meal that my kids would ACTUALLY eat, I knew that I had to get onto making it at home stat! When I started searching the internet for a reference recipe, pretty much all of them used store bought Japanese curry paste or powders, all of which had some not so favourable ingredients. It probably took about 6 tries to get that balance of flavour right, but I'm happy to say this recipe is very true to the flavour of restaurant curry.

You can add tofu, tempe, legumes like chickpeas or beef/chicken as your choice of protein. Like with most curries, this tastes best after it's been sitting in the fridge for a day or so. It freezes well but leave out the potato if you're going to freeze.

Happy eating! - Renee x

Serves 4-6
Prep time: 15 minutes
Cooking time: 50 minutes
Total time: 65 minutes

more curry ingredients web vers.jpg

CURRY INGREDIENTS

  • 4 cups of veggies, chopped into 1 cm cubes (peas, carrots, waxy potato are crucial but everything else is up to you)

  • 2 onions, finely chopped

  • 3-4 cloves garlic, finely chopped

  • 1 inch piece fresh ginger & turmeric

  • 2 apples, peeled and chopped into 1 cm cubes (Pink lady or Fuji are best)

  • 6 cups water (tap or filtered, not hot)

  • 2 tbs stock paste 

  • 2 tbs ketchup (we love Spiral ketchup)

  • 1/4 tsp ground cinnamon

  • 1 tsp ground cumin

  • 1 tsp garam masala

  • 1 tsp ground coriander

  • 1/2 tsp fenugreek seeds

  • 1/2-1 tsp salt + pepper to taste

  • 1 tbs apple cider vinegar (ACV)

  • 1 tbs tamari or coconut aminos

  • 1 tbs Worcestershire sauce (we love Melrose Worcestershire sauce)

  • 2 tbs toasted sesame oil

ROUX INGREDIENTS

  • 2 tbs tomato paste

  • 3 tbs tapioca flour/starch or corn flour

  • 1 cup of liquid from the curry

METHOD

  1. In a large pot, add the sesame oil and heat over a medium flame. Add the onions, garlic, ginger and turmeric and sauté for 5 minutes until the onions are translucent. 

  2. Add all of the remaining ingredients (not the roux ingredients though) and bring to the boil.

  3. Drop the heat to medium, cover the pot 3/4 with a lid and cook for 30 minutes, stirring occasionally.

  4. Keep the heat on the curry. In a small pot, whisk together the tomato paste and flour over a low heat. Add the cup of liquid from the curry and whisk over the heat, increasing it slightly until it starts to thicken. Once fairly thick (you still want it to pour off the spoon) add it to the curry and stir through.

  5. Cook the curry for a further 20 minutes. Taste and adjust seasoning as needed.

  6. In this last twenty minutes, cook/grill up your choice of protein. Chicken thigh or breast, tofu or tempe grilled in a little sesame oil goes well with this curry. Alternatively you could through in 1 1/2 cans of drained and rinsed chickpeas.

  7. Serve with cooked rice/quinoa/buckwheat.

chicken japanese curry web version.jpg
tofu japanese curry web vers.jpg

Chana Dal - Yellow Split Pea Curry

Yellow-split-pea-dahl-web-2.jpg

At Westside Wellness we could live on curry forever!! Chana dal is a nutrient dense, fast, easy and budget-savvy meal. I cook it at least once a fortnight. The kids love it and it has mild and simple favours as far as curry goes. You can always swap the frozen peas for a handful of fresh spinach leaves to brighten the meal up. 

Chana dal is made with split yellow peas - these legumes are packed full of fibre, carbohydrate, protein (including tryptophan, the precursor to our happy hormone - serotonin) and other minerals and vitamins. Yellow split peas contain both soluble and insoluble fibre which helps to keep your bowels regular, balance your blood sugar and cholesterol levels. And best of all - they are really filling! A cup of organic yellow split peas costs only $3 - so it's also an easy way to fill the family up when you are shopping on a budget!

Ingredients

  • 1 tbs extra virgin coconut oil
  • 500gm desiree or nicola potato, washed and chopped into large bite-sized chunks
  • 1 cup of yellow split peas, rinsed thoroughly
  • 1 brown onion, diced
  • 1 clove of garlic, chopped
  • 1 chunk of fresh ginger, grated (about the size of your thumb)
  • 1 tbs garam masala
  • 1 heaped tsp of turmeric powder
  • 1 tsp fenugreek powder (optional)
  • 1 tsp cumin powder
  • 1 x 400g can of tinned tomato (or 4 medium sized diced fresh tomatoes)
  • 1 tsp of tomato paste
  • 1 tbs stock paste (or stock powder)
  • 400mL water (or swap the stock past and water for bone broth).
  • 1 x 400mL can of full fat coconut cream (alternatively you can make your own)
  • 1 x cup of frozen peas 
  • Juice of 1 lime
  • Half a bunch of coriander, chopped

Method

  1. Wash the yellow split peas and leave to soak for as long as you can (up to 12 hours)
  2. Melt the coconut oil in a large pot on medium heat until shimmering, then add the onion.
  3. Once the onions start to soften (about 4 minutes) add the garlic, ginger, garam masala, turmeric, fenugreek and cumin powder. 
  4. Allow the spices to coat to the onions and the garlic and ginger to cook gently.
  5. Strain the yellow split peas and add them along with the potatoes to the onion mixture.
  6. Once the potatoes and peas are all coated in the spices then add the tomato paste, chopped/tinned tomatoes, stock paste/powder and water.
  7. After bringing the pot to the boil, add the coconut cream and quickly turn to the lowest heat.
  8. Simmer for 35 minutes, stirring the pot regularly to prevent the peas and potatoes from sticking to the pot.
  9. Add the peas and cook for another 8 minutes.
  10. Serve with chopped coriander and fresh lime juice. You can serve with cooked brown rice, quinoa or cauliflower rice to stretch the meal further.
Yellow-split-pea-dahl.jpg


Serves 6


Red Lentil & Veggie Curry

Another favourite of Renee's, this red lentil curry is flavoursome without being too 'spicy' for little ones but also tasty for grown ups. The cooking time helps to break down the veggies (hello hidden veggies!), meaning suspicious kids won't know any better and you will feel good knowing the whole family has eaten a veggie loaded meal.

This curry is great made a couple of days in advance, which allows the flavours to grow, and it freezes and defrosts well. A great one to prep on the weekends for a quick reheat through the week!

red lentil curry web vers.jpg

Serves 4-6
Prep time: 10 mins
Cooking time: 1 hour
Total time: 1 hour 10 minutes

INGREDIENTS

  • 2 tbs toasted sesame oil (you can use olive or coconut oil too)

  • 1 onion, finely chopped

  • 3 cloves garlic, finely chopped

  • 1 inch piece each of fresh ginger and turmeric, finely chopped

  • 1 carrot, cut into 1 cm cubes

  • 1 zucchini, cut into 1 cm cubes

  • 1 medium eggplant, cut into 1 cm cubes

  • 2 tsp mustard seeds

  • 1 cup split red lentils

  • 1 tin crushed tomatoes

  • 1/4 tsp ground cinnamon

  • 1/2 tsp ground fennel seeds

  • 3 tsp ground coriander

  • 2 tsp ground cumin

  • 1/2 tsp salt + pepper to taste

  • 4 cups water (tap or filtered, just not hot)

  • 2 handfuls of finely chopped leafy greens (spinach, silverbeet, kale etc)

red lentil curry veg web vers.jpg

METHOD

  1. Slice the eggplant, sprinkle salt on each slice and leave aside for 5-10 minutes (this helps to remove any bitterness). Then chop into 1 cm cubes.
  2. In a large pot, add the sesame oil and heat over a medium flame. Add the onion and mustard seeds and sauté until translucent, approximately 5 minutes.
  3. Add the garlic, turmeric and ginger and sauté for another 5 minutes, stirring occasionally. 
  4. Add all the veggies and cook for a further 5 minutes, stirring to combine everything well.
  5. Pour in the crushed tomatoes, water and add all of the spices, lentils and salt and pepper and bring to the boil. Drop to a medium flame, place a lid on the pot (3/4 on to allow some air to escape) and cook for 1 hour, stirring occasionally.
  6. Taste and adjust seasonings. Add the chopped leafy greens and stir through. Serve with cooked rice, quinoa, cauliflower rice or toasted flat bread.


red lentil curry bowl web vers.jpg

Roasted Turmeric Chicken

roasted-turmeric-chicken

Roasted chicken is a simple way to add protein into your diet. At Westside we always purchase organic free-range chicken, and love Cherry Tree Farms and Milawa Free Range Poultry producers for their commitment to flavour and sustainable farming practices.  

The addition of ground turmeric to this meal provides anti-inflammatory and antioxidant compounds to help keep your body healthy.  

From the leftovers you can have meat for salads and sandwiches for the week, and also gut-healing bone broth.

Ingredients

  • 1 x organic free range chicken
  • 1 tbs ground turmeric
  • 3 x dutch cream potatoes (or 6 x large chunks of pumpkin with skin on for paleo version)
  • 2 x medium beetroots
  • 1 x medium sweet potato
  • 1 x medium zucchini
  • 1 x onion
  • 3 x garlic cloves
  • 1/2 lemon 
  • Bunch of mixed herbs such as rosemary, marjoram, thyme, sage
  • Salt and pepper
  • Dash of extra virgin olive oil
  • 200mL verjuice*

*Denotes optional

Method

  1. Remove chicken from fridge 1 hour prior to cooking, keep out of direct sunlight.
  2. Preheat oven to 170C degrees.
  3. Splash some olive oil into the bottom of a roasting pan.
  4. Cut beetroot, potatoes, sweet potato, zucchini and onion into large chunks.
  5. Place chicken into the roasting pan and drizzle some olive oil. Sprinkle turmeric over the top side of of the chicken. 
  6. Place herbs, lemon and garlic inside the cavity of the chicken.
  7. Surround the chicken with the chopped vegetables. Sprinkle with salt, pepper & any leftover herbs. 
  8. Place the chicken into the oven and roast for 1.5 hours, turning the vegetables once.
  9. Remove the vegetables from the pan and cover. Remove chicken from the pan and leave to rest for 20 minutes before carving.
  10. While the chicken is resting make a verjuice gravy by heating the oven pan on the stove until the drippings become crispy in the pan. Add verjuice and simmer on medium heat until the sauce thickens. 

Serves 6. Enjoy x

Cashew Pesto

cashews-yarraville-naturopath-healthy-eating

Pesto is a simple way to get alkalising and anti-inflammatory nutrients into your diet while not missing out on flavour.

At Westside Wellness we are constantly recommending to our naturopathy clients to eat more greens - and pesto is a quick and easy way to add greens to an existing meal, simply dash some on top of beef, tofu or eggs, add to salad for extra flavour or spread on sandwiches.

Best of all, the whole family loves pesto! It's like my 4 year old has NO idea that it contains nuts (ha ha ha!) and my 2 year old seems to only spy the carbohydrate or protein below it (winning!!!).

Ingredients

  • 2/3 cup raw cashews

  • 1 clove garlic

  • 1 bunch of basil

  • 1/2 bunch of parsley

  • 2 sprigs of fresh rosemary

  • 1/2 cup of extra virgin olive oil

  • Juice and rind of 1 lemon

  • Salt and pepper to taste

Method

  1. Remove the large stems from the rosemary, basil and parsley.

  2. Finely grate the rind from the lemon (leaving the bitter pith behind).

  3. Juice the lemon.

  4. Add 1/4 cup of oil, lemon juice, garlic and salt and pepper to a food processor. Pulse until the garlic, lemon juice and oil are well combined.

  5. Throw in the cashews and fresh herbs.

  6. Pulse until the cashews and herbs are well mixed and not quite a paste.

  7. Leave the motor running and drizzle in the rest of the oil until the pesto becomes a paste.

Store in a jar with a layer of olive oil to keep fresh. Will keep in the fridge for 3 weeks. 

cashew-pesto-naturopath-yarraville

Roasted Cherry Tomatoes with Chickpeas, Zucchini and Greens

Serves 2-4 (2 on it's own, 4 bulked out with rice, quinoa or soft polenta)

Ingredients

  • 1 punnet cherry tomatoes
  • 1 medium sized zucchini, grated
  • 3 large handfuls of baby spinach, or 6 kale leaves finely chopped
  • 1 onion, finely diced
  • 3-4 cloves garlic, finely diced
  • zest and juice of 1 lemon
  • 1 tbs extra-virgin olive oil
  • 2-3 tsp balsamic vinegar
  • 1/2 tsp salt
  • pepper to taste
  • 1/4 cup pine nuts
  • 1 tin chickpeas, drained and rinsed well
roasted cherry tomatoes instagram.jpg

Method

  1. Preheat oven to 180 degrees
  2. Pierce each tomato with a knife, removing any stalks and place in a small baking tray. Drizzle a little olive oil and balsamic vinegar and a sprinkling of salt and pepper over all the tomatoes and give a shake to cover them completely. Roast for 30 minutes.
  3. While the tomatoes are roasting, heat the olive oil in a pan over a medium heat. Add the onions and sauté for 10 minutes until almost caramelised. Add the zucchini, chickpeas, and garlic and sauté for another 5 minutes.
  4. Add the lemon zest and juice, leafy greens, pine nuts, salt, pepper and balsamic vinegar and cook for another minute until the greens have wilted. Stir through the roasted tomatoes, making sure you get all the juices from the baking dish as well. 
  5. Taste and adjust seasonings. Serve with cooked brown rice, quinoa or soft polenta.
chickpeas & tomatoes website ver.jpg

Chicken Soup

Chicken-soup-hot.JPG

Chicken soup is without a doubt one of the easiest, most nutritious, hearty meals we cook in our household. All it takes is one pot - and you can throw all the ingredients in together - cooking doesn't get simpler than that! 

It's a bowl of bone broth-filled goodness, with lots of veg, herbs and spices to add extra nutrition, fibre and wonderful phytonutrients to keep your body healthy. Once the kids start to come down with a sniffle I always get a pot of this underway, and more often than not it keeps a head cold at bay. 

Chicken, parsley and cabbage all contain glutamine - a wonderful amino acid that helps our body's tissues to repair - especially in our digestive tract where all this goodness is headed! I love this recipe for it's gut healing, anti-inflammatory and nutritive profile - but best of all I can make it in about 45 minutes at the end of a busy day when the kids are going mad before dinner!

Ingredients

  • 6 chicken chops (thighs with bones)
  • 1 onion, sliced lengthways 
  • 2 cloves of garlic, finely chopped
  • 1/4 white cabbage, sliced
  • 2 waxy potatoes, chopped into bite-sized chunks
  • 2 small carrots, sliced
  • 2 stalks of celery, sliced
  • 2L of water
  • 6 whole peppercorns
  • 1 bay leaf
  • Bunch of parsley 
  • Pinch of salt

Method

  1. Put water in a large pot on high heat. Add all of the above ingredients.
  2. Bring the pot to the boil and then reduce to a simmer for 40 minutes, until the potatoes are tender. 
  3. Using a slotted spoon, remove the chicken from the pot. Allow to sit on a chopping board for 5 minutes to slightly cool. 
  4. Being careful not to burn yourself, tear the chicken away from each of the bones and return the shredded chicken to the pot. 
  5. Serve while hot with some more freshly chopped parsley. 

Serves 6

Chicken-soup.jpg

Osso Bucco

Osso-bucco.jpg

Spring may be around the corner but the weather is still chilly here in Melbourne's inner west - and that means I'm still cooking lots of hearty one pot meals! I can't go past Osso Bucco in winter, it's rich in favour, simple to prepare and easy on the family's shopping budget. 

For biodynamic beef we like to shop at Hagen's Organics - although they're located outside the inner west we're happy to travel high quality organic and biodynamic meat. The result is always a better tasting meal with less toxin exposure and better impact on the environment when compared to conventional farming practices. 

We like to prioritise our "organic dollar" and this means that we prefer to pay for organic meat and animal products over some fruits and vegetables (think the dirty dozen, clean fifteen). This is because animals, like us humans, store toxins in our body's fat deposits. When you eat some beef, you are also eating a portion of the cow's stored toxins including the pesticides and medications they were exposed to. When you eat biodynamic meat your exposure to these toxins reduces due to the strict farming practices of biodynamic farmers which prohibits the use of artificial chemicals.  

This is my mother's recipe and will always remind me of cosy Sunday night dinners, with the fireplace roaring and our family all together. 

Ingredients

  • 1kg beef osso bucco (about 4 shanks cut into 3 pieces each)
  • 1 tbs extra virgin olive oil
  • 2 carrots, sliced
  • 1 large onion, diced
  • 3 celery stalks, sliced
  • 1 cloves of garlic, peeled
  • Pinch of salt
  • Dash of ground pepper
  • 2 x 400g cans of tinned tomatoes or 8 chopped fresh tomatoes
  • 3/4 cup of red wine - I like Shiraz
  • 1 tsp dried thyme
  • 1 tsp mixed Italian dried herbs 
  • 2 bayleaves
  • 1 tbs stock paste/powder

Method

  1. Preheat oven to 175C fan forced.
  2. Heat oil in a large casserole pot. Add the carrots, onions, celery and garlic over medium heat until the onions are tender.
  3. Remove the vegetable mixture from the pot.
  4. Over a high heat sear the osso bucco in batches using the same pot. Add oil sparingly if required. Once the meat is seared place on a plate to the side.
  5. Return the vegetable mixture to the pan and add the tomatoes, wine, stock and herbs. Bring liquid to the boil, stirring occasionally and then remove from heat. 
  6. Add the osso bucco to the sauce and season with salt and pepper.
  7. Put casserole pot into the oven with the lid on. Cook for 1 + 1/2  hours.
  8.  Serve with brown rice or mashed potato and gremolata (below).

Serves 6

Gremolata

  • 1 bunch of parsely, leaves removed from stems, chopped.
  • Rind of 1 lemon, finely grated
  • 1 clove of garlic, finely diced

Simply combine the gremolata ingredients and sprinkle over the meat before serving.

Limes & 'Cream' Pumpkin Soup

pumpkin soup ingredients.jpg

My family loves this tangy, Asian style take on traditional pumpkin soup and I love them eating it, knowing that they are getting a plethora of nutrients from fibre and protein to betacarotene and calcium. It’s easy to whip up, freezes well and is great re-heated the next day for lunches too. Enjoy!

Ingredients

Makes 4 adult serves + 4-6 baby/child serves or 6 adult sized serves

  • ½ small pumpkin (approx. 500 g), chopped
  • 1 small sweet potato (approx. 300 g), chopped
  • 1 medium carrot, chopped
  • 1 bunch spring onions, finely chopped
  • 3-4 cloves garlic, finely chopped
  • 2 tbs sesame oil
  • 1 tsp ground coriander
  • medium sized chunk of ginger, finely chopped
  • medium sized chunk of turmeric finely chopped, or 1 ½ tsp ground turmeric
  • ½ cup raw cashews + 1 tsp salt*
  • 1 cup split red lentils
  • juice of 2 limes
  • 200 ml coconut cream
  • 750 ml cold (tap or filtered water)
  • stock paste, powder or salt to taste*

Method

  1. Place the cashews, red lentils and 1 tsp of salt in a glass jug or bowl, cover with water and soak for 6 hours maximum. Drain and rinse, and set aside.
  2. Heat the sesame oil in a large pot on medium heat, add the spring onion, garlic, turmeric and ginger and sauté for 5 minutes. Add the pumpkin, sweet potato, carrots and coriander and sauté for another couple of minutes.
  3. Add the water, soaked red lentils and cashews and juice of 1 lime and bring to the boil. Reduce to a low simmer, cover with a lid and cook for 25 minutes.
  4. Allow to cool for 5 minutes or so, then puree with a stick mixer or by adding amounts to a food processor. Return to the pot and medium heat, add the coconut cream and juice of the other lime and mix well.
  5. Add stock paste, powder or salt to taste (I usually add around 2 tbs of stock paste)

Will keep in the fridge for up to 5 days, or in the freezer for up to 3 months.

*I make this soup to feed my entire family, including my 9 month old. I cook and puree it, then set aside serves for my baby and add stock paste to the rest for us. If your little one hasn't tried nuts yet you could omit them, or use a different nut if allergies are present or seeds such as sunflower seeds.

limes & cream pumpkin soup.jpg